Showing posts with label side dish. Show all posts

Cauliflower Tots


Let me just start out by saying that I had NO IDEA that cauliflower was so versatile. I've only had cauliflower in one form before, steamed, as is. It wasn't until recently that I realized that cauliflower can be so much more than just... well, cauliflower. I mean, who'd have thought that you could turn a head of cauliflower into tater tots? I certainly did not. However, when I saw these I knew I had to give them a try. C'mon, it's cauliflower tots! How could you turn that down?


I'm happy to report that these are amazing! Now, you won't be fooled that these are those tater tots you get in the freezer section of your grocery store but they are delicious, and healthy to boot. When I started making them I thought they'd be a pain to make but they weren't all that hard. Time consuming, sure, but difficult they are not. The recipe makes a HUGE batch and it's just the Mr. and myself, so I wound up freezing half of the mixture and later down the road thawing it out and forming them into the tater tots you see above. (I did take pictures of the first batch but these pictures turned out so much nicer) Trust me on this one, try these. You will not be disappointed.

Recipe adapted from Skinny Taste

  • 2 1/4 cups cauliflower florets
  • 1 large egg
  • 1 large egg white
  • 1/2 cup onion, minced
  • 3 tbsp minced fresh parsley
  • 1/2 cup reduced fat sharp cheddar cheese, grated
  • 1/2 cup seasoned breadcrumbs
  • salt and pepper to taste
  1. Steam cauliflower until tender but not mushy. Lay out paper towels and allow to cool. Once cooled finely chop the cauliflower and set aside.
  2. Preheat oven to 400°F.  Spray a nonstick cookie sheet with cooking spray.
  3. In a medium bowl, combine all of the ingredients and season with salt and pepper to taste.

Wasabi Avocado Deviled Eggs


I'm one of those people who hates to bring the same dish to a party twice. It doesn't matter that it's not even the same party or group of people. I just love trying new recipes. So this year when the Mr. and I were invited to a Halloween party, I started looking up things that I could bring. Like a lot of recipes out there, I found this one via Pinterest.


I don't know about you but I love deviled eggs. These eggs takes that recipe and kicks it in the gonads. There's no tangy flavor here. Nope, there's a certain creaminess from the avocado and a kick from the wasabi that you just won't find in your mama's deviled eggs. Not to mention the cool purple cracked effect definitely adds to the Halloween effect. These do take some prep work if you are planning on doing the cracks since the eggs need to sit in the dye overnight. However, if you don't want the look, these are really easy to whip up. The only piece of advice I can give is to wait on mixing in the avocado filling until you are ready to serve. Avocados oxidize just like an apple and will turn brown over a few hours. So by mixing the filling last minute, you won't be showing up to a party with moldy looking eggs.


Recipe adapted from Family Spice
 
  • 4 eggs 
  • 1/2 avocado, seeded and peeled 
  • 1-2 tsp wasabi, paste 
  • 1 tsp lemon juice 
  • 1/4 tsp salt 

  1. In a medium sized pot, cover eggs with water, cover pot and bring to boil over high heat. Let eggs boil for 5 minutes, then turn off heat. Let eggs sit in the water until it becomes room temperature.
  2. Remove eggs, one at a time, and gently press and crack the shell with the back of the spoon. 
  3. Place cracked eggs in a bowl filled with water and add blue and red food coloring until you get dark purple. Place the eggs in water into the refrigerator for 6 hours or up to overnight.  
  4. Peel the eggs and cut in half lengthwise. Scoop out the yolks and place in a bowl. Mix in the avocado, wasabi, lemon juice and salt. Adjust to you liking. (I added more wasabi) 
  5. Place avocado mix into a piping bag and pipe into the hollowed egg halves. Keep chilled.

Black Beans & Chorizo


One of the perks about being in the military is not only the fact that you get to see other places of the world that you might not have ever dreamed of ever going but the awesome people that you meet along the way. This recipe comes from one of my dear friends whom I met about five years ago. I am not really sure where she got the recipe from but I remember her making it one night when I was over her house passing the time while our husbands were deployed. I also remember pretty much polishing off the leftovers as the night wore on.

Apple, Pear and Orange Cranberry Sauce


I am not a huge fan of the cranberry crap in a can, and yes that is exactly what I call it. I will eat a piece to be nice if you put it in front of me but something about the way it remains in the can shape with the ridges in it really just weird me out. With that being said, every year my husband insists that we have this molded jiggly red thing that resembles a can. Even though I try to mash it up so that I am not reminded of what it is, I still cannot eat more than a bite. So this year I decided that since we are going to a friend of ours who is also in the military, the cooking responsibility would be split and I could take the extra time needed to make cranberry sauce from scratch.

Chile and Cheese Rice


I was greeted by this recipe when we had our internet turned on in the new house. Kim from Stirring the Pot posted this recipe after making Marcela Valladolid's rice dish. I was immediately interested in making this dish but I had a couple of problems. First the refrigerator to our new house was broken so I couldn't buy any perishable foods, then the day that we got the new refrigerator, our oven broke. So it actually took a while before I was able to make this but it was well worth the wait.

Greek Salad


I am back and extremely excited that while I was gone I hit 100 followers. I never thought that I would have so many people tuning in to read my recipes. It truly is an honor. The cross country move wasn't too bad. The desert is very hot though, so it is going to take some time to get used to cooking in a kitchen in this heat. I think that it will be safe to say that dinners in this house will be pretty much grilled outside until the summer heat is behind us.

This is a salad that I made before the big move. I got the recipe from Rachael Ray's 30-Minute Get Real Meals cookbook. It was simple to throw together and a nice addition to any dinner. I even ate it alone as a snack. There is nothing crazy to this recipe. If you cannot find peperoncini, you could get away with hot banana pepper rings instead. I am not a huge fan of olives but I found that the saltiness of the kalamata olives really balanced this salad out. It may not be the prettiest thing to take a picture of but it sure was tasty. It does make a huge bowl so be prepared for leftovers.


  • 1 English seedless cucumber, diced into bite sized pieces
  • 1 bell pepper, diced into bite sized pieces
  • 4 celery ribs with leafy greens intact, chopped
  • 1/2 large red onion, chopped
  • 2 vine ripe tomatoes, seeded and diced
  • 1/2 lb feta, crumbled
  • 1/2 c. pitted kalamata olives, coarsely chopped
  • 6 peperoncini, chopped
  • juice of 2 lemons
  • 3 Tbsp. olive oil
  • salt to taste
  1. Whisk lemon juice and oil together.
  2. Toss all of the ingredients together with the dressing until coated. Add salt to taste.

This post is submitted in
Friday Favorites
Foodie Friday
Vegetarian Foodie Friday

Pork Chops in Spiced Apple Pan Sauce w/ Cheesy Garlic Mashed Potatoes


If you are anything like me you will love this recipe. For some reason I cannot eat pork without dipping it into applesauce. I don't know why but that is just the way it is. When I saw this recipe in my 30-Minute Get Real Meals by Rachael Ray I knew I had to give it a try. Now this is only my second recipe that I have made from this book. I will be honest that I am not an overly uhge fan of her recipes. Some sound good but others I have to wonder, what was she thinking? I will say that the pork in the apple pan sauce were a very good pairing but didn't have ingredients for the rest of the meal, so I made garlic cheddar mashed potatoes. I thought of how everyone always says that apples and cheddar cheese go well together and thought "why not put cheddar in my mashed potatoes?" and that is how I came up with this combo.
I found that this dish was easy to make and definitely didn't look like your typical pork chop dinner. I liked that it looked fancy with the apples and the pan sauce but I loved the fact that the pork was all done in one pan. I hate recipes when you have pots and pans on all burners of your stove. You can use whatever apple you have on hand or prefer and whatever cut of pork you like. I used tenderloin since that is the only cut that my husband likes but this recipe will work with whatever you choose. If your potatoes are tender while your pork is still cooking just turn the heat off and let them sit until you are ready. Otherwise if you finish making the potatoes before the pork is finished you potatoes will get cold.

  • 4 boneless pork loin, 1 1/2" thick
  • 2 Tbsp. olive oil
  • 2 Tbsp. margarine/butter
  • 1 medium yellow onion, thinly sliced
  • 2 Tbsp. fresh thyme, chopped
  • 1 apple, cored and thinly sliced
  • 2 pinches of ground nutmeg
  • 1 tsp. ground cinnamon
  • 1 c. chicken stock
  • juice of one lemon
Cheesy Garlic Mashed Potatoes
  • 4 red potatoes, skins on and cubed
  • 1 garlic clove, minced
  • 1 c. cheddar cheese, shredded
  • 1 Tbsp. skim milk
  • 1 Tbsp. fat free plain yogurt
  • salt
  • pepper

  1. In a medium pot bring potatoes and garlic up to a boil over medium heat with water just above the potatoes. Boil until tender about 10 minutes.
  2. Meanwhile, in a large skillet over high heat add oil. Liberally season pork chops with salt and pepper and sear on both sides for 2 minutes or until they are golden brown. Remove the chops from the skillet and set aside.
  3. Add the butter to the skillet, add onion, thyme, sliced apple, nutmeg and cinnamon. Cook, stirring frequently for 3-5 minutes or until apple and onions are tender. Add the chicken stock and bring up to a simmer
  4. Add the pork chops back into the skillet and cook 5-7 minutes or until the pork is cooked through. Add the lemon juice and stir.
  5. Now back to the mashed potatoes. Drain the potatoes and put back into the pot. Add milk and yogurt and mash until desired consistency. Add cheese and stir. Add salt and pepper to taste.


This post is submitted in
Spotlight Yourself
Recipe Share
Make it From Scratch
Party Time Thursday
Strut Your Stuff
Show Off Your Stuff
Friday Favorites

Greek Chicken and Feta Couscous


I decided to crack open my Rachael Ray 30-Minute Get Real Meals cookbook and make dinner from it. I found this really tasty chicken and salad recipe but the only problem was that I didn't have anything for the salad. So I looked in my pantry found the couscous and went to work. I am a huge fan of the yogurt marinated chicken. It not only kept the chicken moist but it gave it flavor as well. If you use wooden skewers be sure to soak them in water for at least 15 minutes before you use them. It helps to keep them from burning as fast as they would if they were dry.

  • 1 c. plain fat free yogurt
  • 1 tsp. ground coriander
  • 1 tsp. ground cumin
  • 1 tsp. dried oregano
  • 1 Tbsp. Montreal steak seasoning
  • 2 chicken breast, cut into bite size chunks
  1. In a bowl combine yogurt, spices and chicken and let marinate one hour in the refrigerator.
  2. Thread meat onto skewers. Brush the grill with oil and grill meat for 5-6 minutes on each side.


Feta Couscous
  • 1 (5.4 oz) box wild mushroom couscous
  • 1/4 c. feta, crumbled
  • 2 plum tomatoes, chopped small
  • 1 tsp. dried oregano
  1. Follow the direction for the couscous but add oregano to the water.
  2. After fluffing the couscous add tomatoes and feta and mix.


On another note after 6 years of service in the Marine Corp, The Mr. picked up Staff Sergeant yesterday. I could not be more proud of him. They did the promotion at the National Museum of the Marine Corp and they even let me pin him.


JalapeƱo Popper Dip


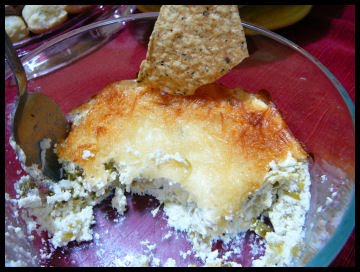
I am never one to do the old school chips and dip when it comes to parties. I love to make new recipes and share it with my family and friends. Sometimes they love it and sometimes I am the only one at the table eating it. However, this recipe had everyone coming back for seconds. Last weekend I hosted my very first Tupperware party and needed to come up with food ideas. I initially was going to go with chicken buffalo wing dip and I even bought everything for it but at the last minute I came across a recipe online at Those Funny Little Girls blog that I just couldn't resist. I goofed up on the recipe and only added one package of cream cheese but I honestly cannot imagine it with two packages. It would definitely die down the heat factor of the dip and that is what a jalapeno popper is all about, it is supposed to be spicy.


To me this recipe was spot on with what my favorite jalapeno poppers taste like minus all the frying and breading. I mixed the dip the morning of the party and 30 minutes before the guests showed up I put it in the oven. I also used fresh jalapenos, I thought that the canned jalapenos would be too soft and soggy. I like the jalapeno pepper to have a little bite left to it, like when you get it from a restaurant. I could sit here all day talking about this. If you are jalapeno popper fan like I am then you have got to try this recipe. I served them with Multigrain Tostitos which in my opinion taste a lot better. I made this for a party of seven and ended up with a sliver left over by the end of the night.


  • 1 (8 oz) 1/3 less fat cream cheese, softened
  • 1 (4 oz) can of mild green chilis, drained
  • 2 jalapenos, diced
  • 1 c. Parmesan cheese, shredded

  1. Preheat oven to 350°F.
  2. In a medium bowl combine cream cheese, chilies and jalapeno and mix until smooth.
  3. Spread dip into small- medium sized oven safe dish.
  4. Spread Parmesan cheese on top and bake for 30 minutes or until the top is golden brown and bubbling.

This post is submitted in:
Just Something I Whipped Up
Made By You Monday

Stuffed Mushrooms


My parents came down from New York this week for a visit. My father is allergic to lactose so it was a little challenging to to make a total lactose free meal but I managed. I know that my dad used to eat stuffed mushrooms when I was a kid and well since he developed his allergy he has not been able to eat them because of the coating and stuffing they use on the mushrooms. So when I was going through my cookbooks trying to decide what I would make while my parents were here, I came across this recipe and decided to give it a try. It came out really good and considering that it wasn't fried, it still had the taste of the stuffed mushrooms I remembered as a kid. I especially liked that it was fresh and not your typical stuffed mushroom you find in the freezer section of your grocery store. It was easy to make and you can triple the recipe with no problem. I ended up typing up the recipe for my mom to take home with her so that she can make it, of course I omitted the cheese for my dad. The picture doesn't do it justice but if you are a fan of mushrooms and love stuffed mushrooms this a must. I made this to go along side grilled steak but you can actually make this as your main too.


  • 3/4 c. butter/margarine
  • 4 cloves garlic, finely chopped
  • 6 portabella mushrooms, stems removed
  • 1 c. bread crumbs
  • 1 egg, lightly beaten
  • salt and pepper
  • Parmesan cheese

  1. Preheat oven to 350° F.
  2. Beat butter and garlic in a medium bowl until softened. Divide two thirds of the garlic butter between the mushroom caps and arrange them, cut side up on aluminum lined baking sheet.
  3. Melt the remaining garlic butter in a pan (reserve the bowl for later use). Add bread crumbs and cook over low heat, stirring frequently, until golden. Remove from heat and pour into a medium size bowl. Salt and pepper to taste. Add beaten egg and stir until thoroughly combined.
  4. Divide the bread crumb mixture between the mushrooms, sprinkle a little bit of Parmesan cheese on top and bake in the oven for 15 minutes or until stuffing is golden brown and the mushrooms are tender. Serve hot.


This post is submitted in:
Recipe Showdown
Tempt My Tummy Tuesday
Motivate Me Monday

Roasted Asparagus with Shallots and Red Wine Vinegar


I usually roast my asparagus with some salt and pepper and call it day but this time I decided to try something different. I saw this recipe over at Cafe Groenhout and decided to give it a try since I had all the ingredients at home. I loved the shallots on the asparagus, they added just enough flavor without over powering it.

  • 2 tbsp oil
  • 1 bunches fresh asparagus spears, trimmed
  • 2 medium shallots, thinly sliced
  • 1 1/2 tbsp red wine vinegar, divided
  • salt and pepper to taste

  1. Preheat the oven to 400 degrees F.
  2. Place the asparagus and shallots in a large bowl, and pour the olive oil and 1 Tbsp. red wine vinegar over them. Season with salt and pepper, and toss to coat evenly. Spread the asparagus spears out in a single layer on a baking sheet.
  3. Bake for 20 minutes in the preheated oven, or until tender and bright green. Shake the pan about halfway through to roll the spears over so they cook evenly. Remove from the oven, and drizzle the remaining vinegar over the asparagus. Toss lightly to coat, and serve immediately.

Garza's Guacamole


I hope that everyone had a fun Cinco de Mayo yesterday. I would have posted this sooner but I had a very busy day yesterday. I went antique shopping with some friends up in northern Virginia yesterday and found the cutest cake stand.


It is extremely heavy and the design in the glass is exactly like my Waterford crystal wine glasses I got from my in-laws as a wedding gift.


The lady at the shop couldn't tell me if it was crystal or not since it was found at an estate sale. However, from the encouragement from my friends and no call back from my husband saying that I couldn't buy it, $30 later I finally had a cake stand. Now all I need to do is make a cake (◕‿◕)


Ok enough babble back to the guacamole...


Yup, it was that good that it got two pictures today. It was spicy, garlicky and creamy all rolled into a very flavorful guacamole. I love love LOVE guacamole but it is an epic fail when I try to make it at home. I don't know what I do to it but it goes straight from the mixing bowl to the garbage every time. My friend Garza (yup, I named it after her) told me about a guacamole that she makes and told me that she would show me how it's done. I sat back and watched her make it and wrote down everything she put in it. I "taste tested" it for her while she was making it, just to be sure it was not poisonous... you can never be to careful. In the end I was extremely happy with the results, I had to walk away from the table or else I would have eaten it all. It makes enough for a party. One tip she gave me was to make sure you keep the avocado pit in the guacamole it helps to keep it from oxidizing as fast as it normally would.


  • 2 avocados
  • 1 plum tomato, finely chopped
  • 1 jalapeno, diced
  • 1 tsp. onion, finely chopped
  • 1/4-1/2 tsp. garlic salt
  • 1/4 tsp. chili powder
  • 1/2 lime, juice
  • salt to taste

  1. In a medium size bowl mash avocados but leave it a little bit chunky. Mix in the rest of the ingredients.
  2. Place avocado pit back into the guacamole. Serve immediately or store in an air tight container.


This post is submitted in
Show Off Your Stuff

Artichoke Risotto with Garlic and Sage


Happy Earth Day everyone! To celebrate this day I thought that I would add an earthy vegetarian dish. I have never had risotto so I was pretty excited to make this. I ran out and bought all of the ingredients for it, got home and got to work. It was not as complicated and touchy as I thought. I thought you have to slave over it for hours stirring constantly and even then it would stick and burn on the pan but it didn't. However, I did hover over it because I was worried about that happening. I made this as a side dish to beef tenderloin and the two went well together but you can always have this as is with grilled vegetables.


  • 4 cups organic vegetable stock
  • 2 tablespoons olive oil
  • 1/4 cup shallots, minced
  • 1/2 cup yellow onion, diced small
  • 2 garlic cloves, minced
  • 1 cup Arborio rice
  • 1/2 can quartered artichoke hearts (about 4 ounces), drained, rinsed and roughly chopped
  • 1 tablespoon fresh sage, finely chopped
  • 1/2 cup white wine
  • 1/2 teaspoon salt
  • Pinch of ground black pepper
  • 1/4 cup shredded parmigiano-reggiano cheese

  1. Warm vegetable stock over low heat; set aside.
  2. In a medium saucepan, heat olive oil on medium-low; add shallots, onion and garlic. Sweat vegetables until shallots and onions are translucent, about 3 minutes. Add rice, stir and coat well; cook about 1 minute.
  3. Add artichokes, sage, white wine, salt and pepper; cook over medium-low heat until wine is absorbed, about 1 minute.
  4. Start to add stock, 1 cup at a time, stirring constantly until rice absorbs all of the liquid (about 15 minutes per cup). Rice should get creamier in texture as stock is added.
  5. When all stock has been added and absorbed, remove rice from heat and mix in cheese. Serve hot.


I got this recipe from kaboose when I was looking for an Earth Day recipe. I also came across some cute projects that I wanted to share. My favorite is the bookmark it is a really cute gift idea.

Seeded Bookmarks
Plastic Bag Area Rug
Magazine Holder
Toothbrush Bracelets
Ladybug Rocks
Sticks and Stones Mobile
Save a Tree for Me T-shirt
Canvas Tote Bag


Sweet Potato and Feta Patties


I made these a while ago and loved them. I am not a huge fan of sweet potatoes unless they are in the for of french fries so I did not h ave high hopes for these. However, I loved them and preferred them over french fries. Now it could be because I recently fell head over heals in love with feta and well you could put feta on a chocolate bar and I would eat it. I know, I know gross but I am just expressing my love for this salty crumbly cheese. I thought that this was an easy dish to make and it went well with the steak that I had made that night for dinner. The only thing I was not a fan of was standing in the kitchen grating the potatoes. It is times like that when I wish I had one of those large food processors with the grater attachments on the top.

  • 1 lb sweet potatoes, peeled and grated
  • 1 egg, lightly beaten
  • 1/3 all-purpose flour
  • 1/4 c. margarine, melted
  • 1/2 c. feta cheese, crumbled
  • 1 Tbsp. oil
  • 4 Tbsp. sour cream, (optional)
  • 2 Tbsp. fresh parsley, chopped (optional)
  • salt
  • pepper

  1. Preheat oven to 325 degrees.
  2. Mix grated sweet potato with the egg, flour, margarine and feta until well combined. Season the mixture with salt and pepper.
  3. Heat the oil in a large nonstick skillet over medium heat. Spoon large tablespoons of the mixture into patties, flattening slightly and cook on both sides until golden brown.
  4. Slide the patties onto a baking sheet covered with parchment paper and bake for 15 minutes or until crisp.
  5. Serve warm. Garnish with sour cream and parsley.


"Shamrock" Biscuits


These are too cute, I love how the parsley look like shamrocks! I thought they were tasty and even had one as "dessert" but the Mr. said they were too fancy for him. WHAT?!? Too fancy? Apparently the herb taste threw him off and he was expecting a bland biscuit. He said it was something you would get in a fancy restaurant and that he is too blue collar for it. So, what my darling husband was trying to tell me was "Kristin, your biscuits are so amazing you should charge people top dollar for them."

Scalloped Potatoes


The key to this is to slice the potatoes very thin. I made this once before and half of the potatoes were not cooked. I made this recently and used my mandolin and had perfect results. The frozen vegetables I used was a carrot, pea and corn mix but whatever you like will work fine.


Tangy Tuna with Asparagus


This dish is pretty simple to make, there is no fuss in the kitchen and no huge mess to clean up. To keep clean up to a minimum line your baking sheet with aluminum foil.


  • 2 tuna steaks
  • 1 tbsp oil
  • 1 tbsp sesame oil
  • 1/3 c. rice vinegar
  • 1/3 c. rice wine
  • 1/3 c. soy sauce
  • 1 c. uncooked rice
  • asparagus
  • salt
  • pepper


  1. Preheat oven to 400 degrees. Drizzle oil on a baking sheet and toss asparagus in the oil until coated. Sprinkle salt and pepper and bake for 15 minutes flipping once.
  2. Cook rice according to package.
  3. Combine , vinegar, rice wine and soy sauce and simmer for about 10 minutes. Add tuna to the pan and cook on each side for 5 minutes.

Spiced Apple Brine Turkey and Apple Cider Gravy

From now on I will brine my turkey. It not only cut the cook time of the turkey by a few hours but it also helped keep it incredibly moist and flavorful. What I did when I did the brine was I cut a hole in the turkey bag at the legs and poured the brine in the bag. I don't have a bowl big enough to fit the size turkey we had so I just put the turkey in my biggest pot and had it standing up in the pot to keep the brine in the bag. As for the day of cooking the turkey I just rubbed some butter on the turkey and sprinkled salt and pepper on it. The apple cider gravy complimented the turkey very well so I figured I would add it in with the recipe as well. The gravy recipe if for two people so adjust according to the number of people you will have. Everyone has their own idea of how gravy is supposed to be so play around with it and see what works best for you.

Brine

  • 1/2 gallon cold water
  • 1 quarts apple cider
  • 1 quarts orange juice, low or no pulp.
  • 1 cup salt (3 cups Kosher or coarse salt)
  • 1/4 cup brown sugar
  • 5 whole cloves
  • 1/2 tablespoon ground nutmeg
  1. Pour apple cider and orange juice into a large pot over a medium heat. Add salt, brown sugar, cloves and nutmeg. Simmer for 15 minutes until salt and sugar are completely dissolved. Remove from heat and allow to cool. Add cold water.
  2. Place poultry in a large plastic container. Pour brine over top. Brine poultry for 1 hour per pound in the refrigerator.
  3. Thoroughly rinse all the brine from the turkey before cooking. Otherwise there will be a salty flavor to the turkey.


Gravy

  • 1 Tbsp butter
  • 1 Tbsp flour
  • 1 c. chicken broth
  • 1/2 c. apple cider
  • chicken bullion (optional)

  1. In a medium size pan add butter and flour and stir over medium heat for about 2 minutes.
  2. Add in chicken broth and cider and bring to a boil. If do not think there is enough chicken taste to the gravy add a tsp of chicken bullion into the pan. Depending on how thick or thin you like your gravy you can add more cider or a flour water mixture (1 tbsp to 1 tbsp) and whisk into the pan to thicken the gravy.

Brussels Sprouts with Walnuts and Craisins


This is my first time having Brussels sprouts. I must be honest and say that it was different. My problem was that I did not have a food processor that was able to slice the Brussels sprouts for me nor do I have a mandolin (yet). So some pieces were thicker than others which caused problems with the cooking time. However minus the large slices the dish was not bad, you just need to make sure you get thin slices.

  • 1 pound fresh Brussels sprouts, rinsed and sliced very thin
  • 3 ounces coarsely chopped walnuts
  • 6 pieces of turkey bacon, chopped in small pieces
  • 3 tablespoons unsalted butter
  • 1/4 teaspoon kosher salt
  • 1/4 teaspoon freshly ground pepper
  • 4 ounces craisins

  1. Slice the Brussels sprouts using the thinnest slicing disk of a food processor. If you do not have a food processor, you may slice thinly with a knife or a mandolin.
  2. Set a 10-inch straight-sided saute pan over medium-high heat and add the walnuts. Cook, stirring continually, until the walnuts darken in color and begin to give off a toasted aroma, approximately 2 minutes.
  3. Remove the walnuts and add bacon. Cook the bacon until crispy about 5 minutes.
  4. Add the walnuts back into the pan and add the butter, stir to combine. Once the butter has melted, add the Brussels sprouts, salt and pepper and cook, stirring continually, until the color brightens and the sprouts are just tender, approximately 6 minutes. Remove the pan from the heat, add the craisins, toss and serve.

Sweet Roasted Acorn Squash


This year I decided to try a lot of new things for Thanksgiving dinner. Now I had the Acorn Squash once before a few weeks ago and liked it but this was my first time making it. For those who have never had an acorn squash before, this dish tastes just like a slice of pumpkin pie. Now the stuffing in the middle is just just stove top stuffing, nothing fancy. So I will just type in the recipe for the acorn squash.

  • 1 acorn squash, cut in quarters, seeds removed
  • 2 Tbsp butter
  • 2 Tbsp brown sugar
  • 1/2 tsp ground nutmeg

  1. Preheat oven to 450 degrees.
  2. Place squash on a baking sheet cut side up. Place 1/2 Tbsp of butter and brown sugar in each slice. Add 1/8 tsp of nutmeg in each and season with salt. Bake until golden brown and tender, about 30- 45 minutes, basting flesh of squash several times. Serve warm.