Showing posts with label casserole. Show all posts

Vegetable Pot Pie


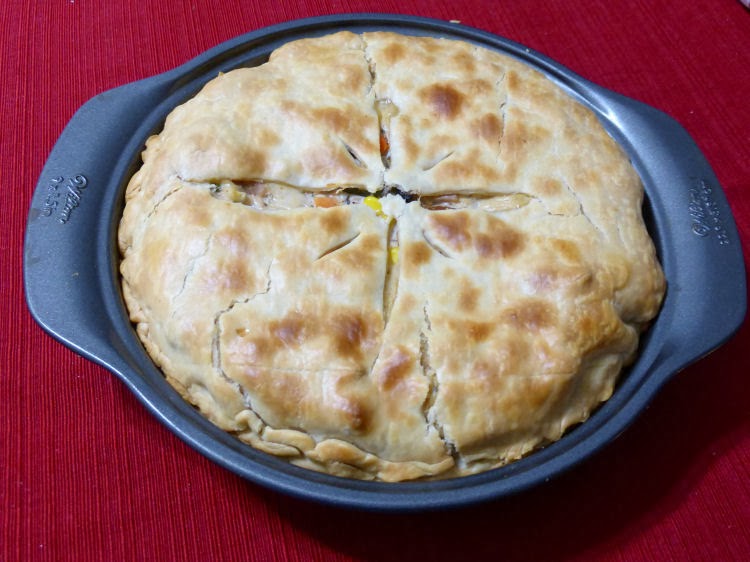
One thing I love about the colder weather is heating the house up with the smell of a delicious casserole. I love pot pie and have tried a few recipes over the years. However, I realized that I've never tried a vegetable only pot pie. Since I already had everything on hand, I decided to give this recipe a try.


Every week I sit down and go through my recipes and my Pinterest board to come up with all the dinners I plan to make for that week. That way I know what I need to get from the grocery story. This was a recipe that I didn't have to buy anything for because I already had everything on hand. I even had some white wine already opened. Well, technically it's a boxed wine... so I always have some white wine "opened". By the way, if you like white wine, I recommend the Black Box Chardonnay. That's what I used for this dish and it's probably my favorite boxed white wine. It's got a light, crisp, and subtle fruity flavor that you'd expect from a white wine but then it ends on a creamy note. So, yeah, that's my wine of choice for this dish but any white wine like chardonnay or sauvignon blanc would work.


recipe adapted from Life Currents

  • 3 medium Yukon gold potatoes
  • 3 tablespoons olive oil
  • 1 large onion finely chopped
  • 1 1/2 cup carrots, peeled and sliced ¼-inch thick
  • 2 tablespoons unsalted butter or margarine
  • ½ cup unbleached all-purpose flour
  • 1 ½ cups milk
  • 2 cups vegetable broth
  • 1 ½ teaspoons kosher salt
  • ½ teaspoon freshly ground black pepper
  • 1 teaspoon dried thyme
  • ¼ cup white wine
  • 3/4 cup frozen peas thawed
  • 1 sheet puff pastry thawed and unfolded


  1. Preheat the oven to 400° F.
  2. Pierce the potatoes several times with a fork or knife, and microwave until cooked through, about 5-10 minutes, depending on the size of the potatoes and the power of the microwave. Allow potatoes to cool slightly so that you can handle them, and chop into ½-inch to 1-inch dice. Transfer cubed potatoes to a large bowl, and set aside.
  3. Heat a large pot or Dutch oven over medium-high heat, and add 1 tablespoon oil. Once the oil is hot, sauté the onions until starting to brown and caramelize, about 15-20 minutes. Add the carrots to the onions, and continue to cook, and until tender, about 5-7 minutes. Transfer cooked vegetables to the large bowl with the potatoes, and set aside.
  4. Reduce the heat to medium, and add the butter and 2 tablespoons oil to the same pot. When the butter has melted, stir in the flour and cook, stirring constantly for 1 minute. Slowly and gradually stir the milk, broth, thyme, salt, and pepper into the flour mixture. Continue to stir constantly as the sauce thickens. Stir in the white wine, and cook for an additional minute.
  5. Turn the heat off, and stir the cooked vegetables and the peas into the sauce, until well combined. Taste for salt and pepper.
  6. Pour the filling into a 13x9-inch baking dish, and bake in 400° F oven for 18 minutes. Remove the dish from the oven (keeping the oven on and close the door behind you), and place the puff pastry over the top of the filling, gently folding some of the pasty over the sides of the pan. Using a sharp knife, cut 3 slits in the top of the puff pasty to allow steam to escape. Return the baking dish to the oven and bake for an additional 10 minutes, until the puff pastry is golden brown and the filling is bubbly. Allow to cool for 5-10 minutes before serving.

Pumpkin Curry Macaroni and Cheese


It's finally FINALLY cooled back down here in SoCal. While everyone back home was talking about rainy days and drinking hot cider, I was over here on the west coast dying from the insane dry heat we were getting. Nothing says fall more than wearing summer dresses and drinking iced coffee.  So, needless to say, I was really happy when the temperature started to dip into the 70's and immediately started pulling out my cans of pumpkin.


While most people view the fall as time to break out pumpkin spice things, I always look to the pumpkin itself. I love finding recipes that use pumpkin puree as part of the ingredients in a savory dish. This recipe was one that I was really excited to try because the Mister loved mac and cheese, and I'm a huge fan of curry dishes. So, the fact that it combined the two and incorporated pumpkin into the mix was a complete win.

recipe adapted from Flavor Mosaic


  • 2 cups of elbow macaroni
  • 2 Tablespoons butter or margarine
  • 3 Tablespoons all-purpose flour
  • salt and pepper to taste
  • 2 cups Half and Half
  • 1 ½ teaspoons curry powder
  • 1 cup pumpkin puree
  • 2 cups shredded Mozzarella cheese, divided
  • ½ cup panko bread crumbs

  1. Preheat oven to 350 degrees F. Cook the pasta to al dente in a large pot following package directions. Drain cooked pasta, then return to pot.
  2. In a large skillet or saucepan, melt butter over medium heat. Stir in flour, salt, and pepper. Pour in Half and half. Cook and stir over medium heat until slightly thickened and bubbly. Stir in curry powder. Stir in pumpkin and 1 cup mozzarella until cheese is melted. Stir cheese sauce into pasta to coat. Transfer the macaroni and cheese to a2-quart rectangular baking dish that's been sprayed with cooking spray.
  3. Sprinkle the remaining mozzarella over the pasta. Sprinkle the bread crumbs on top of the cheese. Spray with cooking spray.
  4. Bake, uncovered, for 30 minutes or until bubbly and top is golden. Let stand 10 minutes before serving.

Baked Lentil Ziti


I'm always on the look-out for recipes that take a well-loved dish with meat, and turn it into a meatless version. I'm also a huge lover of beans. Even when meat-free dishes don't call for beans, I'm usually adding them in anyways. So I was really excited when I saw this recipe that took one of my favorite family dishes, baked ziti, and not only omitted the ground meat, but also added in lentils. It's been a very long time since I've had baked ziti but that's all about to change with this recipe. I thought it was delicious and I will definitely be holding onto this recipe for later.


This is a super easy dish to make. I feel like I say that all the time but I am a lover of easy recipes. You can cook the lentils and pasta ahead of time and set them in the refrigerator until you're ready to make the dish. You could even make the whole thing, put it in the casserole dish and store it in the refrigerator until you are ready to eat, and then just pop it into the oven. Either way, it's as easy as cooking pasta and lentils, mixing everything together in the casserole dish, and baking it until it's bubbly. I loved the taste of this and definitely used a little bit more sauce than the recipe called for but that's because I don't like dry pasta.


 There are a couple things I want to point out that I did differently from the recipe. I used gluten-free pasta. I've tried using gluten-free pastas in the past for various dishes and have found that they don't always hold up, especially when it's a one-pot recipe where the pasta cooks in the liquid with everything else. However, the pasta worked great in this dish, but I did under-cook it by about 2 minutes, so it still had some bite to it before I added it into the casserole dish to bake. So, if you plan to use gluten-free pasta just be sure to under-cook it a bit so that it holds it's shape and doesn't turn to mush while the casserole bakes. I also didn't put the cheese on the casserole for the initial baking process. Mainly because the casserole came right up to the top and if I put foil on it, the cheese would have stuck... and I didn't feel like rummaging around my cabinet looking for toothpicks. So, I put the foil on the casserole without the cheese for the first half of baking and then when it was time to crank the heat and remove the foil, I put the cheese on and baked it until it was bubbly.  Like I said before, I really enjoyed this dish and it will be a winter staple in our house from here on out.


recipe adapted from Cookie and Kate


Lentils:
  • 1 tablespoon olive oil
  • 1 onion, chopped
  • ¼ teaspoon salt
  • 2 cloves garlic,  minced
  • 1¼ cups regular brown lentils, picked over for debris and rinsed
  • 3 cups water
Pasta and everything else
  • 12 ounces ziti, rigatoni or penne pasta
  • 2 cups grated part-skim mozzarella cheese
  • Salt and freshly ground black pepper, to taste
  • Pinch of red pepper flakes (omit if sensitive to spice)
  • 24 ounces spaghetti sauce
  • 1 cup cottage or ricotta cheese

  1. To cook the lentils: In a large saucepan over medium heat, warm the olive oil until shimmering. Add the onion and salt. Cook, stirring occasionally, until the onion is turning translucent, about 4 to 5 minutes. Add the garlic and cook until fragrant, about 30 seconds. Add the lentils and water, and stir to combine.
  2. Raise the heat to high and bring the mixture to a simmer, then reduce heat to medium-low and gently simmer until the lentils are tender and cooked through, about 30 to 40 minutes. Drain the mixture well in a fine-mesh sieve and return the lentils to their pot. Set aside.
  3. Meanwhile, preheat the oven to 350 degrees Fahrenheit and bring a large pot of water to boil. Cook the pasta just until al dente, according to package directions. Drain and return the pasta to the pot. (if using gluten-free pasta under-cook the pasta. It will continue to cook in the oven)
  4. Add the lentils to the pasta. Add ½ cup of the cheese, reserving the rest for later. Season to taste with salt, freshly ground black pepper, and red pepper flakes (if using).
  5. Pour 1 cup of the marinara sauce into a 13x9-inch baking dish. Spread the sauce around with a spatula so the base of the baker is evenly coated. Pour the lentil and pasta mixture into the baker and spread it so it’s evenly distributed. Using a spoon, dollop cottage or ricotta cheese in big spoonfuls over the pasta, then just lightly swirl the mixture a bit so the cottage cheese is still concentrated in those areas.
  6. Drizzle the rest of the sauce evenly over the dish (adding extra sauce if you’d like) and gently spread it over the pasta. Sprinkle the remaining mozzarella evenly over the dish. Cover the baker tightly with aluminum foil—don’t let it touch the cheese—or stick a few wooden toothpicks down the center and place a generously sized piece of parchment paper, folded in the middle to make a “tent” over the baker.
  7. Bake for 30 minutes, then remove the covering, increase the heat to 450, and continue baking until the cheese on top is golden and spotty, 3 to 9 more minutes. Remove from the oven and let it cool for 10 minutes before serving.

Tamale Pie


One of my favorite dishes that I make probably at least once a month is this tamale pie. Since I gave up meat some time ago, I haven't really been able to find and therefor eat a traditional tamale, and let's be honest, tamale making is no joke. It's definitely not something I'd want to do since I tend to be pretty lazy when it comes to cooking. So, when I saw a recipe that converted the tamale into a skillet bake, I knew I had to give it a shot.


The recipes I was finding online all had meat products in them and even though vegetables aren't normally in tamales, I wanted to incorporate more sustenance. So, I did some tweaking and kind of made my own tamale pie. One thing that I love about this dish is that it's so easy to make and yet it's bursting with flavor. It's also versatile and ingredients can be swapped out. For instance, if you don't want beans and in fact want meat, then use a pound of meat of your choosing. If you don't like bell peppers and instead want to use mushrooms, or omit all vegetables from the dish, you can do that, too. Like I said, I make this dish just about once a month and every month I made it a little different depending on what I have on hand. Sometimes I use plain diced tomatoes (not as flavorful as the tomatoes with chilies in them), sometimes I add a diced jalapeno, sometimes I've even added a mixture of beans because I didn't have enough of one kind on hand. You can also change the ratio of toppings as well, as long as the cornbread base stays the same, the ingredients you put on top can be changed around to your liking.


  • 2/3 cup flour
  • 1/2 cup yellow cornmeal
  • 3 Tbsp. sugar
  • 1 Tbsp. baking powder
  • 1/4 tsp. salt
  • 1 egg
  • 1/4 cup plain fat-free yogurt (sour cream also works)
  • 1 cup corn, thawed if frozen and if canned be sure to drain and rinse the corn
  • 1 (10 oz) can Rotel diced tomato with chilies (I use habaneo but they have other varieties)
  • 1 (10 oz) can red enchilada sauce
  • 1 onion, chopped
  • 1 bell pepper, chopped
  • 2 tsp. cumin
  • 1 Tbsp. chili powder
  • 3 cups cooked pinto beans (or 2 cans of pinto beans, rinsed and drained)
  • 2 cups cheddar cheese
  • 1/2 cup salsa


  1. Preheat oven to 400° F
  2. Mix the first nine ingredients (from flour to diced tomatoes) and pour into a 14 in round skillet or cast iron pan. Bake for 20 minutes and remove from heat.
  3. Meanwhile, saute the onion and bell pepper, add the cumin and chili powder, and saute for another minute.
  4. Stir in cooked beans and cook until vegetables start to get tender. Mix in the salsa and removed from the heat.
  5. Poke holes in cornbread with a fork and pour the enchilada sauce over the top.
  6. Pour bean mixture on top of the cornbread and spread it out to evenly cover the cornbread.
  7. Top with cheese and bake for 20 minutes. Serve hot.

Cheddar and Chile Egg Casserole

 
So, you may remember me saying something about us moving recently. Well, on our first day, as we were moving in our stuff from the moving truck, our neighbor came over to introduce herself. She even invited me over for a brunch she was having with some of the other neighbors and thought it would be a great way for me to meet them. I was kind of nervous and excited to meet everyone. I didn't need to be because they were all super nice. One of the dishes my neighbor made for the brunch was this green chile egg casserole. I'm not a huge fan of eggs. I can stomach an egg sandwich, even a hard-boiled egg, but I just can't handle omelets. It's just too eggy for me. So, I cautiously took a small piece of the casserole, so as to not be rude, and wound up trying to not shovel it all in my mouth as quickly as possible. It was so light and airy. It practically melted in my mouth and I found myself clamoring for the recipe. I'm so glad I found it online because this is definitely a must for when we have company spend the night.


When I saw there was cottage cheese in the dish I was in denial. I didn't remember there being white chunks in my egg at the party. The flour also threw me for a loop. However, trust me, it will all work out. The cottage cheese adds that fluffiness to the casserole while keeping it super moist. I used low-fat cottage cheese but whatever you prefer will work. This is essentially something you can make the night before, store it in a airtight container or bag, and then the morning of just give it a good whisking to whip it all up before popping it into the over.


recipe adapted from Rachael Ray

  • 3 TBSP butter/margarine, melted 
  • 5 large eggs, beaten 
  • 1 cup cottage cheese 
  • 1/2 cup shredded cheddar cheese 
  • 1 (4 ounce) can diced green chilies 
  • 1/4 cup flour 
  • 1/2 tsp baking powder 
  • 1/2 tsp salt

  1. Preheat the oven to 350 degrees . Brush an 8-inch square baking dish with 1 tablespoon butter and set aside.
  2. In a medium bowl, whisk together the eggs, cottage cheese, cheddar cheese, chiles, flour, baking powder, salt and the remaining 2 tablespoons butter. Pour into the prepared dish and bake until set, about 35 minutes.


Gluten-Free Cheesy Veggie Bake


While my family back home on the east coast is getting hit with below zero temperatures and snow, us on the west coast are getting hit with El Niño rains. Not that I'm complaining though because we are in some serious need of rain. I'm pretty sure the palm trees outside are actually clapping with joy and dancing in the rain and not getting whipped around in the wind.


Needless to say, the next two weeks (or however long this stretch of rain lasts) I will be making casseroles and crock-pot meals to help combat the dark and gloomy days ahead. Last night I made one of my favorites and realized that I haven't even shared this on the blog yet. I make it all the time, even in the summer. It's easy to make. The most time consuming part is baking and shredding the spaghetti squash. Otherwise, you just mix everything in your baking pan and pop it in the oven. I've been known to assemble the casserole the day before, store it in the refrigerator, and then pop it in the over the next day. Plus, this is perfect if you are counting calories. It's only 273 calories per serving and this makes 6 huge servings.


recipe adapted from PopSugar

1 whole spaghetti squash
2 Tbsp olive oil
1 red pepper, diced
1 zucchini, diced
1 carrot, shredded
2 cloves garlic, minced
1 (14.5 oz) can diced tomatoes, drained
16 ounces tomato sauce
1/2 c. shredded mozzarella cheese
1/4 c. shredded Parmesan


  1. Preheat oven to 350ºF.
  2. Poke spaghetti squash all over with a knife and place the poked squash on a baking pan and bake at 375ºF for 45 to 60 minutes. If you are short on time cook the squash in the microwave for eight to 12 minutes until soft. While it's cooking, add the oil, garlic, pepper, zucchini, and carrots to a pan, cooking over medium heat.
  3. Cut the squash in half, scoop out the seeds, and with a fork, scrape the flesh from the peel. It should flake off easily in strings, resembling spaghetti. Place the spaghetti squash flesh in a casserole dish. Add the cooked veggies, diced tomato, sauce, and most of the cheese and mix well. Sprinkle leftover cheese on top and bake for 30 minutes or until the cheese is bubbly.
  4. Allow to cool for five minutes, serve, and enjoy.

French Toast Bread Pudding


Happy new year, everyone! I hope you guys had a wonderful holiday break. I know I sure did. The Mr. and I didn't really go anywhere or do anything, but it was nice cuddling up on the couch, watching movies. I was able to try out a bunch of recipes over the holidays. One of which was this lighter version of the french toast casserole that I make for Christmas every year.


This one is actually a lot easier to make since you don't have to make the praline topping. It's also healthier too since it has half the eggs and sugar. The Mr. sliced up the homemade cinnamon bread I'd made the day before while I got to work zesting and mixing the batter ingredients together. Then we just poured the mixture over the eggs, covered the pan with foil, and stored it in the refrigerator the next day. The orange zest added a light citrus flavor that really brightened up the dish. However, even though this is delicious, it won't be replacing the not-so-good-for-you praline french toast casserole from years past. It will however be a recipe I will go to when company is staying over.


  • cooking spray
  • 4 c. bread, cut into 1-inch cubes
  • 4 oz. reduced-fat cream cheese, softened
  • 2 very ripe bananas, mashed
  • 3 large eggs
  • 3/4 c. low-fat milk or dairy-free milk
  • 3 Tbsp. pure maple syrup
  • 1/2 tsp. vanilla extract
  • zest of 1 orange
  • 1 Tbsp. confectioners sugar, for garnish (optional)


  1. Lightly spray a 8x8 baking dish with cooking spray.
  2. Add the bread to the pan. With a standing or handheld mixer, beat the cream cheese and bananas at medium speed until smooth. Add the eggs, one at a time, mixing well after each addition. Pour in the milk, maple syrup, vanilla, and zest, and mix until smooth. Pour the cream cheese mixture over the top of the bread; cover and refrigerate overnight. 
  3. Preheat the over to 375°F.
  4. Remove the bread mixture from the refrigerator and let it sit out 15 minutes. Bake for 30-40 minutes, or until a knife comes out clean and the center is set. 
  5. Sift confectioners sugar over the top if desired. Cut into squares and serve immediately.


Hearty Lentil and Mushroom Shepherd's Pie

With weather cooling down here, I've been doing a lot more cooking in my oven. I don't know what it is about cooler temperatures that makes me want comfort food but it never fails. I've tried a few different shepherd's pie recipes over the years and I'm always looking to try different versions. There are just so many spins you can make on this classic dish that the possibilities are endless. So far I've made your classic shepherd's pie with ground beef but I've also flipped the switch on it for holidays and meatless versions.


This is a really easy recipe to make. Especially if you have a big skillet that can go in the oven. You can just cook everything in the pan (except mashed potatoes, those you still have to do separately), and then top it with the mashed potatoes and throw it in the oven. There's no need to transfer it to a casserole dish. That is, unless you are the complete opposite of me and just LOVE to do dishes. The less dishes I have to do, the happier I am.


So in short, if you are looking for a hearty shepherd's pie sans the meat and dairy, this is a great recipe. It's got just enough going on that it will appease any meat eater while still catering to anyone who can't eat meat or dairy. The Mr. and I are hot sauce fiends so we felt like it needed some hot sauce mixed into the lentil base but the great thing about shepherd's pie is that you can alter it however you'd like. I'm lazy and don't see the purpose in peeling my potatoes so I left the skins on. But if you want to try sweet potatoes instead of red? Go for it! After all, that's how I came up with the corned beef version. I just took our typical St. Patty's day dinner and turned it into a pie. So taste the lentil mixture before putting the potatoes on top and tweak it to your hearts content.


recipe adapted from Vegan Holiday Cooking


  • 8 large or 10 medium potatoes
  • 2 tablespoons margarine
  • 1/2 c. non-dairy milk such as rice/soy/almond milk (just not almond coconut)
  • Salt to taste
  • 2 Tbsp. olive oil
  • 1 large onion, finely chopped
  • 2 cloves garlic, minced
  • 6 oz mushrooms (crimini or button mushrooms)
  • 2 (15 oz) can lentils, lightly drained but not rinsed (or about 3 1/2 cups cooked lentils with a little of their cooking liquid)
  • 2 Tbsp dry red wine, optional
  • 1 to 2 Tbsp. reduced-sodium soy sauce
  • 2 tsp seasoning blend (such as Mrs. Dash table blend)
  • 1/2 tsp dried thyme
  • Freshly ground pepper to taste
  • 3 Tbsp. cornstarch or arrowroot
  • 8 to 10 oz. baby spinach or arugula leaves
  • 1 c. fresh bread crumbs or panko bread crumbs (gluten-free if needed)

  1. Dice the potatoes (you can peel them first if you prefer mashed potatoes without the skin). Place in a large saucepan with enough water to cover. Bring to a simmer, then cover and simmer until tender, about 20 minutes. Drain and transfer to a small mixing bowl.
  2. Stir the margarine into the potatoes until melted, then add the non-dairy milk and mash until fluffy. Cover and set aside until needed. Preheat the oven to 400° f.
  3. While the potatoes are cooking, heat the oil in a medium skillet. Add the onion and sauté over medium heat until translucent. Add the garlic and mushrooms and continue to sauté until the onion is golden.
  4. Add the lentils and their liquid and bring to a gentle simmer. Stir in the wine (if using), soy sauce, seasoning blend, thyme, and pepper. Cook gently for 5 minutes. Combine the cornstarch with just enough water to dissolve in a small container. Stir into the lentil mixture.
  5. Add the spinach, a little at a time, cooking just until it’s all wilted down. Remove from the heat; taste to adjust seasonings to your liking.
  6. Lightly oil a 2-quart (preferably round) casserole dish, or two deep-dish pie plates. Scatter the breadcrumbs evenly over the bottom. Pour in the lentil mixture, then spread the potatoes evenly over the top. If using two pie plates, divide each mixture evenly between them.
  7. Bake for 30 to 35 minutes, or until the potatoes begin to turn golden and slightly crusty (I always pop mine under the broiler for a few minutes to give it a nice golden crust). 
  8. Let stand for 5 to 10 minutes, then cut into wedges to serve.

Tex-Mex Quinoa Casserole

I just recently decided to become a vegetarian and have been looking for recipes that will please the non-meat eaters as well. You see, both the Mr. and myself grew up on a meat and potatoes diet. Every meal had a meat, a starch, and a side of veggies. So while the Mr. was away on training I decided to take the jump into becoming a vegetarian. I'd always wanted to do it. Heck, I remember declaring that I'd no longer eat meat when I was younger, only to pile my plate with rotisserie chicken that same night for dinner. I have tried multiple times to stop eating meat but the truth is, I had no idea how to not eat meat. Am I now subjecting myself to tofu dinners for the rest of my life? Or worse, salads every day? Thankfully, the internet has an abundance of vegetarian recipes that will not only satisfy the non-vegetarians in your life, but will make the switch a little easier.


This is a really easy recipe to make and it's delicious too. You can make it ahead, store it in the fridge, and then pop it in the oven when you're ready. Which is exactly what I did. Since this recipe makes a huge casserole, I wound up putting about half of it into my silicone muffin tin and freezing it for a later date. Which, even when it's thawed out and reheated, it still tastes just as good as the day it was made. I've actually served this to the Mr. when he got back and he really enjoyed it. Even though I got a strange look from him when I pulled out a frozen ball from the freezer and called it dinner. The only bad thing about this recipe is that we both felt like hot sauce was in order, but then again, we are hot sauce fanatics.


Recipe adapted from iFoodReal 

  • 1 1/2 cup quinoa, dry 
  • 2 tbsp coconut oil 
  • 2 garlic cloves, crushed 
  • 1 (12 oz) can of corn, drained (fresh or frozen corn is fine) 
  • 3 bell peppers, diced 
  • 1/2 medium jalapeño pepper, seeded and diced 
  • 1 tbsp cumin 
  • 1 (15 oz) can of black beans, rinsed and drained 
  • 3/4 cup plus 1/4 cup (for garnish) cilantro, chopped 
  •  1/4 cup plus 1/4 cup (for garnish) green onions, chopped 
  • 1 1/2 cup plus 1/2 cup Tex Mex cheese, shredded
  • 3/4 cup coconut milk, light 
  • 1/4 tsp salt

  1. Cook quinoa as per package instructions and undercook by 4 minutes. Add to a large mixing bowl.
  2. Preheat oven to 350 F degrees and get 8 x 11 baking dish ready. Set aside.
  3. Preheat large skillet on medium heat and add coconut oil. Add garlic and cook for 30 seconds mixing often. Add corn, bell peppers, jalapeno pepper and cumin. Mix and saute undisturbed for 3 minutes, mix and saute for another 3 minutes. Transfer to a bowl with quinoa.
  4. To a bowl with quinoa and sauteed vegetables, add black beans, 3/4 cup cilantro, 1/4 cup green onions, 1.5 cup cheese, coconut milk and salt. Mix enough to combine all ingredients.
  5. Transfer the mixture to 8 x 11 baking dish, sprinkle with remaining 0.5 cup cheese and bake for 30-40 minutes uncovered. Remove from the oven, sprinkle with remaining cilantro and green onions, and serve warm. No need to let the casserole to cool down.

Pizza Casserole


In the colder months it's always nice to have casseroles.  Not only are the easy to make but running the oven always helps take the chill out of the air.  This was a great spin on both a pasta casserole and a pizza.  I wound up only putting pepperoni on half since my friend is a vegetarian.  This is a really easy and versatile dish.


This is a recipe that you can assemble beforehand and put in your refrigerator until you need to bake it.  It's also a great casserole to give to someone to bake at their leisure (new babies, house warming, etc.)  You literally just toss everything together in the pan.  I think I've made this recipe three times now each with different toppings added in.

Adapted from Premeditated Leftovers


1 lb. rotini or penne pasta noodles,
31/2 cups of pizza sauce
2½ cups water
2 cups of your favorite grated cheese
24 – 32 pepperonis (optional)
¼ cup onions (optional)
2 tablespoons diced bell peppers (optional)
½ cup sliced mushrooms (optional)
other favorite pizza toppings.
  1. Place uncooked pasta noodles in a 13×9 baking dish.
  2. In a large bowl combine the pizza sauce, water, and your favorite pizza toppings: onions, peppers, mushrooms, etc
  3. Pour pizza sauce mixture over noodles, mix enough to ensure the noodles are coated.
  4. Sprinkle cheese over the top of the noodles.
  5. Spread pepperonis on top of the cheese.
  6. Bake at 425 for 30 – 40 minutes or until the noodles are al dente and the cheese is melted.
  7. Let rest for several minutes before serving.

Chicken Pot Pie


I don't know about the rest of you guys but we went through one cold spell here in the desert and that had me pulling out all my winter recipes. I grew up on frozen chicken pot pies. So to me, winter is not complete without one. I went out and bought whole chicken to roast in the oven in hopes to take the chill out of the house. Then the next day I took the leftover chicken and used it in the pot pie for another oven warming meal.


Because I used leftover chicken, I got to skip the whole cooking the chicken part. Which, when it's so cold I don't want to come out from under the warm throw blankets on the couch, is a total bonus for me. Plus, I like to be lazy and cut corners when I can. Who doesn't?


recipe adapted from Allrecipes

2 (9 inch) pie crusts
4 chicken breast (about 2 cups), boneless, skinless
1/2 c. onion, chopped
1 tsp. poultry seasoning
1 (10.75 ounce) can condensed cream of chicken soup
1 (10.75 ounce) can condensed cream of mushroom soup
1 c. cheddar cheese, shredded
2 c. frozen mixed vegetables
1 c. mushrooms, sliced
salt and pepper to taste

  1. Preheat oven to 350 degrees F. Lightly grease and flour a 2 quart casserole dish.
  2. Place chicken breasts, onion, and poultry seasoning in a medium saucepan and add enough water to cover. Simmer over medium heat for 8 to 10 minutes, until chicken is cooked through. Drain and dice chicken.
  3. In a large bowl, combine chicken, onions, cream of chicken soup, cream of mushroom soup, Cheddar cheese, mozzarella cheese, mixed vegetables, mushrooms, and salt and pepper. Mix thoroughly.
  4. Lay one sheet of pastry in bottom of greased and floured pan. Pour chicken mixture over pastry. Cover with second sheet of pastry. Seal edges of top and bottom pastries. Cut steam vents in top.
  5. Bake in preheated oven for 50 minutes, until pastry is golden brown.


Undone Stuffed Pepper Casserole

I LOVE stuffed peppers but with it being just the Mr. and I, making stuffed peppers is a whole lot of work for just two people. Not to mention that there is no such thing as making just 2 stuffed peppers, the filling you make could stuff a grocery store worth of peppers. So... what does one do when cooking for two? ALAS, I have the solution for you! (okay if you don't know what it is yet, then you clearly haven't been paying attention to the website you're currently on). Instead of stuffing "x" amount of peppers to use up your filling, what about mixing it all together in a pan, throwing it in the oven and forgetting about it until the oven screams "BEEP"? Oh, did I forget to add that it tastes exactly the same as its stuffed pepper cousin? Yup! I don't know about you but I always end up chopping my stuffed pepper up on my plate creating a chaotic mess anyways. So why not skip the extra steps and make a casserole. The leftovers are delicious and if you are cooking for just one, this is a perfect make ahead dish, you can store the leftovers in individual servings in your freezer for dinners down the road.

Baked French Toast Casserole w/ Praline Topping


Every year on Christmas Eve I would make this french toast casserole before heading out to my aunt's house for the annual family holiday get together. That way, the next morning when we all watch my niece open up her gifts from Santa, I can throw the casserole in the oven and by the time she's done, the casserole's done. It really does time out perfectly and I found that it is a lot more enjoyable to just relax Christmas morning with a hot cup of java, listening to Christmas music in the background while my niece tears into her gifts. However last year we were unable to make it home for the holidays but I still kept the tradition alive and made the casserole at home. I will have to do the same this year as well since we won't be home for the holidays again. Plus, I think I might be working on Christmas, so this might be more a dinner when I get home than a breakfast. Yeah, apparently National Parks don't close for Christmas and someone has to show up and talk to visitors. Oh well, I am not complaining, I would much rather work the holiday that have one of my co-workers who has a family at home waiting for them spending their Christmas day sitting in the visitor center.

Chickpea Pot Pie w/ Cornbread Crust


With the temperatures finally getting below 60 here in the desert, I am making more winter friendly recipes. One of which was Joanne's amazing pot pie. The recipes she comes out with are amazing and I am pretty sure that unlike myself she has taken food photography classes because her pictures make you drool on your keyboard without even realizing it. So, no surprise here that when I saw this recipe, realized I had everything in the pantry to make it, I made it for dinner that night. The entire time I was thanking Joanne for posting it. I grew up on that frozen pot pie crap that you throw in the oven, yeah... you know what I'm talking about. I have since made my own pot pies but never made one with cornbread topping before! Why on earth did no one think of this before? I am pretty sure that as I mercilessly dug into my pot pie that night, I was saying all of this out loud to the Mr. Usually I ask him if he likes any of the new recipes I try but I am pretty sure I blurted out at the table "I hope you like this because I love it and plan on making this recipe a lot." I don't believe he complained but then again, I was too preoccupied devouring my dinner.

Lentil Shepherds Pie

I am a huge fan of shepherds pie. I never had it growing up and a few years ago I saw a shepherds pie recipe in my food magazine, made it and fell in love. Since then I have been trying different variations, like the corned beef and cabbage shepherds pie that I made for St. Patrick's day. I think I like it so much because everything in you need in a dinner is right there in one pan. You have your protein, veggies and dairy. I really like this lentils version because not only is it inexpensive to make but you don't even realize that there is no ground beef in it.

Buffalo Chicken & Potato Casserole

Do you ever have those days where you really don't want to dirty a ton of dishes in the kitchen? I love cooking and eating but I hate the cleanup after wards. Now it wouldn't be so bad if the Mr. and I had the "I cook, therefor you clean" method to break up the responsibility but we don't. See the Mr. is deathly allergic to doing the dishes just like I can go into cardiac arrest if I get anywhere near the laundry basket. And since the Mr. is the breakfast/burger king and I prefer more of a variety when it comes to my dinner, I am the one cooking and cleaning up the mess. So it is a no brainer that I get giddy when I come across recipes that don't use all of my pots/pans and bowls just to make one measly little meal.

Creamy Beef and Noodle Casserole


One of the good and bad things about the military is moving. It is good because about once every few years you downsize and get rid of all the junk that you have accumulated over the years. It's bad because when a friend moves, you are usually the one taking all of that stuff. Usually when we move I invite my friends over to go through and take any food and cleaning products that I cannot take on the move with me and that is usually what everyone does around here. So this past weekend when the Mr. and I went out help one of our good friends get their stuff into storage for a deployment, I was not surprised to find myself leaving their place with more stuff in the vehicle than what I showed up with. Not that I am complaining because I wound up saving a trip to the commissary that weekend. Not only did I walk away with food but I was also given recipe magazines as well. So the next day when I was home, I looked through the magazines and found this recipe in Kraft Foods Holiday 2010 Food & Family magazine.

Chile and Cheese Rice


I was greeted by this recipe when we had our internet turned on in the new house. Kim from Stirring the Pot posted this recipe after making Marcela Valladolid's rice dish. I was immediately interested in making this dish but I had a couple of problems. First the refrigerator to our new house was broken so I couldn't buy any perishable foods, then the day that we got the new refrigerator, our oven broke. So it actually took a while before I was able to make this but it was well worth the wait.

Spicy & Smoky Macaroni and Cheese


Behold REAL macaroni and cheese. Not the stuff that comes from a box with powdered cheese, although I do enjoy that sometimes. This is a basic ratio of my mother's macaroni and cheese but I mixed in my own cheese to make it spicy for my husbands birthday. He wanted macaroni and cheese and blueberry cheesecake for his birthday so that is what he got. I went out to the commissary (military grocery store) and started looking through their cheese selection. I found fontina cheese that I thought would go good with the cheeses that I had at home. I know that it is a lot of different cheeses but I wanted to use up what I had. The apple wood smoked gruyere really set it apart from the typical taste of macaroni and cheese because it gave it this smokey flavor, it almost tasted like there was smoked ham in the macaroni. The habanero of course added some heat but not too much to where you couldn't eat it, just enough to make you notice that there was a kick.

Polenta Lasagna


This was my first polenta experience and I don't think that it will be my last. I used pre-cooked polenta to make this dish but if you make your own or have left overs you could use that instead. I found that this dish was simple to make but not an easy task to plate in one piece. It would fall apart when plating which makes no difference to me for eating but when I am trying to take a nice picture it was quite a pain. However, I thought that the lasagna was delicious. I liked the polenta instead of the noodles, it was a nice change from your typical lasagna. I actually made this for my Earth Day dinner.