Showing posts with label dessert. Show all posts

Celtic Apple Crisp with Honey Whiskey Whipped Cream


This is a recipe that is perfect for both St. Patrick's day and the fall. Especially with apple picking going on. Honestly, I'm not a huge fan of baking and am always looking for short cuts when it comes to the holidays and having to bake pies. Shocker, I know. While I love cooking, I don't relish spending half my day in the kitchen. So, this recipe is perfect for those like me who want to make a delicious dish or dessert without spending the day slaving away in the kitchen.


I love this recipe and it will be one I will make at least once a year. It was easy to make, I had just about all the ingredients on hand, and it tasted amazing. While I thought it was perfect, the Mister, who is a fan of whiskey, thought it could use more whiskey. Ha! Me, I'm not a fan of whiskey so the small hint of whiskey in this was just right for me. So, I split the whipped cream up and added a touch more whiskey to his batch.

recipe adapted from Home and Plate


  • 4 large honeycrisp apples, peeled and sliced into cubes
  • 1 teaspoon cinnamon
  • 1/2 cup water
  • 2 tablespoons whiskey
  • 3/4 cup brown sugar
  • 3/4 cup flour
  • 3/4 cup old-fashioned oats
  • 1/2 cup butter, melted
  • 1 cup heavy whipping cream
  • 1 tablespoon honey
  • 1 tablespoon whiskey


  1. Peel, core and chop the apples into 1-inch cubes.  Place the apples, cinnamon, whiskey and water in a bowl and toss. Then place the apples into a prepared pie pan. 
  2. In a small bowl combine the sugar, flour, oats and melted butter and mix until crumbly and well blended.  Sprinkle the mixture evenly over the apples.
  3. Place the pan in a preheated 350° oven and bake for 45 minutes until the crust is golden brown.  
  4. Whip the heavy cream on high speed until soft peaks form. Dissolve the honey in the whiskey stirring to incorporate. Add the honey flavored whiskey to the whipped cream in the final minutes of whipping. 
  5. Once the apple crisp has cooled serve it with the whipped cream.

Slow-cooker S'mores Cake


 You may not know this about me but I love all things S'mores. ALL things. I have tried various versions of S'mores, I've made them in a microwave, in the over, on the stove, and of course over the fire. I've have S'mores cheesecake, cupcakes, cookies, pastries, Pop-Tarts, you name it. I even have a mini S'mores Christmas tree with mini S'mores snowmen ornaments. Trust me, I'm a fanatic about S'mores and this is definitely a MUST if you are anything like me. ;)


One thing I LOVE about this recipe is how easy it is to put together. There's not a whole heck of a lot of work that you put into this but even if there was, I feel like it would be worth it. This is kind of like a S'mores lava cake mashup. You get all the flavors of S'mores but with this gooey, fudgy center. Mmm! Now one thing I did change in the recipe, and I do it all the time when a cake calls for oil, is I swapped out equal parts natural apple sauce for the oil. Trust me, this is an amazing cake that you don't have to fuss over. I even had leftovers, and after a quick zap in the microwave they were just as good as they were the night I made it.


adapted from A Savory Feast
  • 1 1/2 cups graham cracker crumbs
  • 6 tbsp butter, melted
  • 1 (15.25 oz) box chocolate cake mix
  • Water, egg and oil as directed on cake mix box
  • 1 (12 oz) bag chocolate chips
  • 1 1/2 cups mini marshmallows
  1. Grease a slow cooker.
  2. In a medium bowl, combine the graham cracker crumbs, and butter. Mix until well blended.
  3. Press the graham cracker crust down evenly in the bottom of the slow cooker.
  4. Mix the cake mix according to the directions on the box. Add 1/2 of the chocolate chips.
  5. Pour the cake mixture into the slow cooker.
  6. Cook on high for 2 to 2 1/2 hours or until a toothpick inserted into the center comes out clean.
  7. Top with marshmallows and the remaining chocolate chips. Let melt before serving.

Snickers Cookies


You know how much I love trying recipes that I find on Pinterest. With that being said though, they don't always turn out like the picture. I've had my fair share of Pinterest Fails and this was one of them. Now I know you're looking at that picture thinking, "That's a fail?" Well, no that one isn't a fail, this one is...


You see they were supposed to turn out like this...

http://buddingbaketress.blogspot.com/2011/09/marbled-peanut-butter-chocolate.html
Picture from Bakergirl site.

Huge difference. The peanut butter was just dried crumbly peanut butter and the chocolate was almost on the verge of being cake better consistency. It was a complete mess and I was not at all surprised when mine didn't come out looking like the picture. I went though the comments and realized that a lot of people had the same exact problem that I did. I had a huge amount of dough though and decided to improvise. I combined the two doughs together into one.


And that is how I went from a fail to a really delicious cookie. I did change the recipe quite a bit though. I mean, a total of 4 cups of sugar AND 4 full Snickers bars seemed like a bit much.I'm not overly convinced those extra cups of sugar would have made a lick of difference in the finished product though. The two doughs were just all over the place. However, once I mixed the two doughs together, not only did it split the process in half but the cookie turned out much more appealing to look at.

I had a little helper with me while making my cookies.


recipe adapted from Bakergirl


Peanut butter dough
  • 1 cup natural creamy peanut butter
  • 1 cup natural chunky peanut butter
  • 4 Tbsp. coconut oil, melted 
  • 2 eggs
  • 1 cup chocolate chips

Chocolate dough
  • 1 cup margarine/butter
  • 1/4 cup sugar
  • 3/4 cup brown sugar
  • 2 eggs
  • 1 teaspoon vanilla
  • 2 3/4 cup all-purpose flour
  • 1 1/4 cup cocoa powder
  • 2 teaspoons baking soda
  • 1/4 teaspoon salt
  • 1 regular-sized Snicker bars, chopped into small pieces
  • 3/4 cup caramel chips/bits

  1. Preheat oven to 350°F. 
  2. Line baking sheets with parchment paper.
  3. For the peanut butter dough, cream together the peanut butter, oil, and egg until dough forms. Stir in chocolate chips. 
  4. For the chocolate dough, cream together the margarine, sugar, and brown sugar until well combined. Slowly beat in egg and vanilla until well combined. In a separate bowl, mix together the flour, cocoa powder, baking soda, and salt. Slowly add the butter mixture until well combined. Stir in chopped Snickers pieces and caramel chips. 
  5. Mix the two doughs together until just barely combined. 
  6. Take two tablespoons of dough and gently roll into a ball and place on a lightly greased baking sheet. 
  7. Bake for 9-11 minutes, or until done. Let cool 5 minutes on baking sheet before transferring to a wire rack to cool completely.

Chocolate Macadamia Nut Cupcakes


The Mr. and I don't really celebrate Valentine's day. We did when we first started dating and got married but now it's just one of those white noise holidays for us. I refuse to go out to eat, I don't want him buying me chocolates or flowers, and I'm not talking about that thing us ladies do where we say we don't want something but we really do, it's just a typical day for us. This year I didn't even make a fancy dinner; I made pizza. However, what we did do was make cupcakes and drink a bottle of champagne that a friend got me for Christmas that had been sitting in the back of the fridge begging to be opened. So I guess in our own crazy way we celebrated by drinking mimosas, eating pizza (not at the same time because that would be gross), and baking cupcakes while slightly intoxicated.


Initially I wanted to make the white chocolate coconut cupcakes I made about 5 years ago but those were a bit of work and I have been pretty lazy lately. It could have something to do with the 80° weather we've been having here. Plus, I had bought this big bottle of Trader Vic's macadamia nut liqueur last year when I had planned on making lava cakes for me and a couple of friends for a girls-night Valentine's day thing. That never happened because by the time we all got off of work, we were done for the day and nobody wanted to do anything, let alone bake cake. So here I am with this bottle just collecting dust when I found this recipe for amaretto cupcakes. Almonds... macadamias... they're kind of the same thing, right? This was probably the most perfect recipe to have made that night because it was super simple and a breeze to whip up. I even brushed off my piping equipment that I bought for those Wilton cake decorating classes I took way back when. Oh and if you have a dairy allergy or you're vegan these will be right up your alley. It wasn't until I was stuffing my face with cupcakes that I realize these had no eggs in them. Although, I did end up using real butter for the frosting so mine weren't vegan in the end.


 recipe adapted from Love & Olive Oil


  • 1 cup coconut milk (I used cashew milk since I had it on hand)
  • 1/3 cup canola oil
  • 1 tsp vanilla extract
  • 3/4 cup sugar
  • 1 Tbsp macadamia nut liqueur
  • 1 cup all-purpose flour
  • 2 Tbsp. all-purpose flour
  • 1/3 cup cocoa powder
  • 3/4 tsp baking soda
  • 1/2 tsp baking powder
  • 1/4 tsp salt

For Frosting:
  • 1/2 cup butter or margarine, room temperature
  • 2 Tbsp cocoa powder
  • 2 1/2 - 3 cups confectioners' sugar
  • 1-2 Tbsp macadamia nut liqueur
  • 2 Tbsp coconut milk or other non-dairy milk (again, I used cashew milk)

  1. Preheat oven to 350° F. Line muffin pan with paper liners.
  2. Whisk together the coconut milk, sugar, oil, macadamia nut liqueur, and vanilla extract and beat till foamy (Mine never really got foamy so after about 5 minutes I moved on). In a separate bowl, sift together the flour, cocoa powder, almond meal, baking soda, baking powder, and salt. Add in two batches to wet ingredients and mix until no lumps remain (or very few remain).
  3. Pour into liners, filling each with about 3 tablespoons of batter. Bake 18-20 minutes, until a toothpick inserted into the center comes out clean. Transfer to a cooling rack and let cool completely.
  4. For frosting, cream butter/margarine until smooth and fluffy, 2-3 minutes. Add in cocoa powder, along with 1/2 cup confectioners' sugar. Beat until combined. Beat in macadamia nut liqueur to taste. Continue adding sugar 1/2 cup at a time, adding cream as necessary, until light and fluffy, 3-5 minutes. Spread or pipe onto cooled cupcakes. Store cupcakes in the refrigerator.


Bananas Foster Chia Pudding


I'm relatively new to the whole chia seeds thing. I have no idea what to do with them, and for the price, I don't want to waste them. So I was really excited when Joanne from Eats Well With Others posted this recipe. I've tried a few of her recipes over the years and they have never let me down.


I love that this was such a simple recipe. It does require some planning ahead since the chia seeds soak in the coconut milk overnight to make the pudding portion of the dessert. Other than that, you just make the topping when you're ready to eat. The contrast between the warm topping and the cold pudding is out of this world. If you have ever wondered about chia seeds, this is a must try recipe, and for those bananas foster fans out there, you need to try this version. Trust me, it was amazing.


Recipe adapted from Eats Well With Others


  • 2 c. coconut milk (refrigerated, not canned. You can also use nut milk or regular milk)
  • ⅓ c. chia seeds
  • 2 Tbsp maple syrup
  • 4 Tbsp unsalted butter
  • 2 bananas, peeled and sliced into coins
  • ½ c. packed brown sugar
  • ¼ c. bourbon
  • ½ tsp cinnamon
  • ½ c. chopped pecans, toasted
  • pinch of salt

  1. In a large bowl, stir together the coconut milk, chia seeds, and maple syrup. Refrigerate overnight.
  2. The next more, melt the butter in a large saucepan over medium heat. Add in the bananas and saute for a minute or two, until starting to brown. Add in the brown sugar and bourbon and cook, stirring frequently, until sauce has thickened and bourbon has mostly cooked off. Remove from the heat and stir in the pecans, cinnamon and salt.
  3. After it's overnight stay in the fridge, the chia and coconut milk mixture should be thickened, almost the consistency of tapioca pudding. Divide it among 4-6 bowls and top with the bananas foster topping. Serve warm or cold.

Maca Truffles


Every year around this time I start pulling out recipes for cookies. Even though it's just the Mr. and me, I will still try to make at least a batch of cookies, gingerbread marshmallows, and fudge. I always try to make a different cookie each year and this year I decided to try something a little different. Instead of making a butter and sugar packed cookie, I went with a healthy energy truffle instead. This was my first time trying maca and I wasn't overly sure what to expect. Maca is a root (like radish) that has a lot of health benefits ranging from balancing your mood, providing energy, and even relieves PMS and menopause symptoms. I tasted the maca straight from the bag before making the truffles and it's not sweet. It actually reminds me of powdered peanut butter.


This is a super easy truffle recipe. You literally just mix everything, either by hand or in a food processor. These are not sweet truffles, they are actually kind of dry, so make sure you have a glass of milk, but they are delicious. I found that when I needed a snack halfway through the day, I would eat one of these and I'd be good until dinner time. They definitely help give you that little boost you need. Plus, they look like some fancy truffle you'd get at a shop. So if you want to make something for your health conscious friend, or want to try something a little healthy this year for your holiday treat, give these a try.

Recipe adapted from Mary Vance, NC


  • 1/2 c. cocoa powder
  • 1/2 c. raw maca powder
  • 1 c. nut butter (almond, walnut, peanut, or coconut)
  • 1 Tbsp. virgin coconut oil
  • 1-2 Tbsp honey
  • 1 tsp. cinnamon
  • dash of vanilla
  • pinch of salt
  • pinch of cayenne pepper
  • cocoa powder for dusting


  1. In a large bowl blend the nut butter, honey and vanilla. 
  2. In another bowl mix cocoa powder, maca powder, cinnamon, salt and cayenne pepper.  Mix the dry ingredients into the wet until combined. Taste to make sure the flavors are good. (I wound up adding a little more cayenne for more of a kick)
  3. Roll about a tablespoon of mixture into a ball. Dust with cocoa powder and chill in the refrigerator for at least one hour.


Snickers Cake


The Mr. hates frosting cakes. So it's safe to say that in previous years, when I've chosen a cheesecake as my birthday cake, he was pretty happy with that decision. This year I decided to change it up from the usual cheesecake and go with something a little different. This past year I lost my beloved cat of 18 years to cancer. She had been by my side for just about half of my life. I had gotten her one day after school when I was a little girl. I was sitting out side my aunt's house when a lady walked by and pulled a kitten out of her hoodie pouch and asked me if I wanted it. No little girl is going to say no to a kitten... and I was no exception. So that day I walked into my house holding my new kitty and begged my parents to let me keep her. The name I came up with for my new best friend was Snicker. Because I thought she had the markings of a Snickers bar... and because that's my favorite candy.


So this year, when the Mr. asked me what kind of cake I wanted I immediately decided on a Snickers cake. I wasn't sure what that meant, but I wanted something that reminded me of my kitty cat. This was the easiest sounding cake I came across. Not to mention is looks amazing! The pictures are not deceiving because I devoured this cake in a week. Baking the cake in the caramel sauce turns the cake into this moist caramel-y cake with peanuts. The whipped cream "frosting" is like the nugget center. This was the perfect cake to not only celebrate my birthday but to honor my furbaby as well.


Recipe adapted from My Honey's Place 


  • 1 box Devil Food cake mix (and ingredients called for in box directions)
  • 1 c brown sugar
  • 1 stick of butter
  • 1 c chopped peanuts
  • 2¼ c heavy whipping cream
  • 2 heaping Tablespoons powdered sugar
  • 2 full size snickers bars

    1. Mix cake batter according to directions 
    2. In a pan on med heat combine brown sugar, butter and ¼ c of whipping cream. Stir constantly until combined. Remove from heat as soon as combined and melted (caramel will continue to cook in oven).
    3. Spray 9 inch round cake pans with cooking spray.
    4. Split caramel mixture into pans evenly.
    5. Sprinkle chopped nuts over caramel, ½ cup in each.
    6. Gently add cake mix to pans equally (I use a spoon to add dollops around to avoid spreading caramel to sides)
    7. Bake per box directions.
    8. Allow to cool in pan for 5 minutes. Run knife around the edge to loosen cake.
    9. Cut off any bump that may have formed  over the pan while baking for a level surface. (the Mr. didn't do this and the cake turned out just fine)
    10. Place a plate on top of pan and flip allow pan to sit upside down on plate to cool. 
    11. While cake is cooling beat remaining heavy whipping cream until peaks form add powdered sugar then continue to whip until stiff peaks form add half whipping cream on caramel side (top) of bottom layer and spread. 
    12. Add top cake layer and then add remaining whipped cream to top and spread crush Snickers bars (I freeze to make this easier). Sprinkle on top of cake. 
    13. Keep in fridge until ready to serve.


This recipe is linked to
WFMW

Sunshine Cupcakes


When trying to come up with a recipe for cupcakes for Trifecta's birthday/adoption party, I found these from the Red Hat Society Cookbook. My go-to for any cake is always chocolate but I know that that's a huge no-no when dogs are involved and the last thing I wanted was a dog getting their chompers on a chocolate cupcake. So when I found these cupcakes I knew they were perfect


They definitely taste like their name. They were very light and citrus-y in flavor. The whipped cream "frosting" just added to the lightness of the cupcake. I'm pretty sure I ate 3 of them in one sitting, and that didn't count the ones I "taste-tested" before the party. I made the cupcakes a day in advance, made the frosting the morning of (since I had to work that day) and stored it in a air tight container in the refrigerator. Then, before the party started I piped the frosting onto the cupcakes and stored them back in the refrigerator until we were ready for them. I know I used boxed cake mix but I was doing so many other things that I literally followed the recipe without making my own cake mix (which I normally do). But by all means, if you have your own yellow cake mix use that in substitute for the boxed cake mix.


Cake
  • 1 (18 oz) package of yellow cake mix
  • 1/2 c. vegetable oil
  • 4 eggs
  • 1 (11 oz) can mandarin oranges, undrained

  1. Preheat the oven to 350 f. In a large bowl beat the cake mix, oil, eggs, and oranges with an electric mixer for 3 minutes; this will crush the oranges. 
  2. Pour the batter into paper-lined muffin tins. 
  3. Bake for 18-20 minutes or until toothpick inserted in center comes out clean. 
  4. Let cool completely before frosting.

Frosting
  • 1 (8 oz) container of lite cool whip 
  • 1 (8 oz) can of crushed pineapple, undrained
  • 1 (5 oz) package instant vanilla pudding


  1. Mix the Cool Whip and pineapple in a medium bowl. 
  2. Fold in the pudding mix a little at a time. 
  3. Frost cupcakes and store in the refrigerator.

Trifecta's Gator Party (To get the full list of goodies)

Black Bean Avocado Brownies


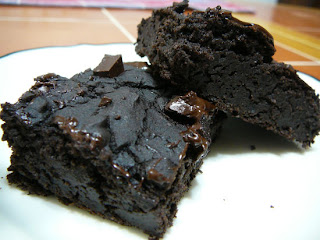
No I have not lost my mind. Let me explain. It was all Pinterest's fault! But to be honest, it's all thanks to Pinterest that I came across this recipe from Monique's blog, Ambitious Kitchen. Monique is a kitchen Goddess for coming up with these brownies. Brownies are my #1 weakness. They're right up there with puppies and kittens. There is nothing that will tempt me more than a batch of brownies. And when I say tempt, what I actually mean is sneak into the kitchen in the middle of the night to scarf down the rest of the brownies, so that in the morning I have to make another batch just so that the Mr. doesn't know that I ate them all in the middle of the night. Oh yes, brownies are definitely my weakness. So that's why when I saw a recipe that had no flour or butter, I was hopping aboard the black bean avocado brownie train or the BBABT for you abbreviation lovers out there.


Before you ask, no you do not taste the beans or the avocado and no I am not lying to you. What you get is a very moist (even 3 days later) chocolatey brownie with zero guilt. I brought some into work for my co-worker to try and she loved them. Just like the Mr. and me, she was surprised that they taste just like your average brownie. I of course used dark chocolate cocoa powder and dark chocolate chunks but that's because it's my personal preference. These are now my new fake out dish. I used to love bringing cheesecake to parties because people think it's so decadent and difficult to make but now, I think it's time for the BBABT to come through and make some appearances.


  • 1 (15.5 oz) can black beans, rinsed and drained
  • 1 egg plus 2 egg whites
  • 1/3 of a large ripe avocado
  • 1 teaspoon olive or canola oil
  • 1/3 cup, plus 1 tablespoon unsweetened cocoa powder
  • 1/4 teaspoon baking powder
  • 1/4 teaspoon baking soda
  • 1/4 teaspoon salt
  • 1 teaspoon pure vanilla extract
  • 3/4 cup sugar or sugar substitute of choice
  • 3 tablespoons chocolate chips

  1. Preheat oven to 350 degrees F. Grease a 8×8 inch baking pan.
  2. Place all ingredients besides chocolate chips into blender or food processor. Process or puree until ingredients form a smooth batter. Pour into prepared pan, sprinkle with chocolate chips, nuts, or swirl in peanut butter and bake for 35-40 minutes or until knife inserted in center comes out somewhat clean and top of the brownies begin to crack.
  3. Cool pan completely on wire rack then cut into 16 squares.

This post is submitted in 
My Meatless Mondays
Gluten-Free Wednesdays

Snowman's Balls


When I was younger, I remember helping my mom and dad roll the balls every year around the holidays. My father's co-workers and friends looked forward to the holidays because it meant that my dad would bring in his famous rum balls. As a kid I just thought that everyone liked them because they were cookies rolled in powdered sugar... now I know better. This recipe packs a wallop of a punch because of the rum you use. This year I decided to rename the rum balls to something a little bit more festive and bring them into work for my co-workers and boss (aka Boss Lady) to take home and enjoy. Since we live in the desert and don't get too much snow here (although we do see some), I decided to go with a funny name and package them in individual sacks for each person to take.


As far as cookie recipes go, this is by far the easiest thing you will whip together. You literally just mix everything together, roll into balls and roll into the powdered sugar. Now of course if you want a more mild rum flavor, go with a different rum but if you want something that will put a little hair on your chest and will make your friends take notice, than stick with the 151. Trust me, they won't be forgetting these rum balls any time soon.


  • 1/2 c. Bacardi 151 rum
  • 1 box of vanilla wafers (about 2 1/2 cups crushed)
  • 1/4- 1/2 c. chopped walnuts
  • 1 c. powdered sugar
  • 1 1/2 Tbsp cocoa powder
  • 2 1/2 Tbsp light corn syrup
  • powdered sugar for coating

  1. Grind the wafers into a crumb like consistency. 
  2. Mix all the ingredients together.
  3. Roll into balls. 
  4. Fill a shallow dish with powdered sugar for coating. Roll balls into powdered sugar.

Baileys Brownies w/ Baileys Frosting


I try not to make brownies to often since I could easily eat an entire batch in one sitting and not feel any guilt. I think the last time I had brownies was years ago. It is by far my favorite thing to eat. I mean, what's not to love? It's baked fudgey chocolatey goodness... who could resist that?!


I was at work talking to one of my friends and all of a sudden out of the blue I blurt out "I want brownies!". You can imagine that she gave me an odd look. But then when I said "Oooh Bailey's Brownies!!", she jumped on board with my train of thought. It wasn't to much later I was at home looking up recipes. Apparently, I'm not the only one that had the revelation that brownies and Baileys sounded like a good combo since there were a lot of recipes on the internet. I took two recipes that I found and combined them into one. What you have before you is Baileys Brownie Heaven.


Recipe adapted from Yummly and Lynn's Kitchen Adventures

  • 1 1/4 c. all-purpose flour
  • 1 tsp. baking powder
  • 1 tsp. salt
  • 2/3 c. unsweetened cocoa powder
  • 2 c. white sugar
  • 1 tsp vanilla
  • 1/4 c. Baileys Irish Cream
  • 1/2 c. unsweetened apple sauce
  • 2 eggs

Bailey's Frosting
  • 2 c. powdered sugar 
  • 1/2 c. softened butter 
  • 1/2 tsp. vanilla extract
  • 2 TBSP. Baileys Irish Cream
  • 2 1/2 tsp. milk

  1. Heat oven to 350 degrees. Grease bottom only of a 9x12 inch pan.
  2. BROWNIES: In a large bowl mix all of the dry ingredients. Add vanilla, Baileys, apple sauce and eggs. Beat 50 strokes with spoon. Spread into greased pan.
  3. Bake 22 to 25 minutes or until set. Do not over bake. Cool one hour or until completely cooled.
  4. FROSTING: In a small bowl beat 1/2 cup butter until light and fluffy. Beat in powdered sugar, vanilla, 2 tablespoons Baileys, and milk, adding enough milk for desired spreading consistency. Spread over cooled brownies. 

This post is submitted in
Just Another Meatless Monday
Made By You Monday

Gingerbread Marshmallows


I know everyone makes gingerbread cookies for the holidays. It seems like gingerbread and Christmas go hand in hand. So why not spruce up your typical holiday drink and add a little gingerbread flair to your hot cocoa? I came across this recipe last year and instantly fell in love. It isn't that hard to make but you do have to have patience to allow the marshmallows to fully set before you cut into them. But all good things come with time and this is no exception.

Tiramisu Cheesecake Mini's


So I just recently hit my two year mark with Holy Cannoli Recipes! I would like to thank everyone who has stuck by my side through my 2 years of blogging. I know that I have not been on a lot recently. I was on vacation for a little bit for my birthday and started working part time, so I have been a little stressed on time. However, I have stocked up quite a few recipes for posting and cannot wait to share them with you. But first I would like to revisit my first post on HCR which was the Tiramisu Cheesecake.

Pot O' Gold Chex Mix


St. Patrick's Day is right around the corner and I could not be happier. For me it is not about green beer and getting drunk but about being proud of my heritage. I won't lie, I do look forward to the Shamrock shake (who doesn't?) but what I really love is that everyone, Irish or not, sport green, which by the way is my favorite color. St. Patrick's to me is about as big as Thanksgiving. We always go all out and make the traditional Americanized St. Patrick's Day feast where the star of the show is... you guessed it, Corned Beef and Cabbage. However last year I came up with a recipe that turned the duo into a St. Patrick's Day Shepherd's Pie, which is our new tradition. We even had the cutest "Shamrock" Biscuits to go along with our dinner.


Dark Chocolate Cupcakes w/ Cappuccino Buttercream & Dark Chocolate Covered Coffee Beans


So, the title is a mouthful but if you are like me, you stopped paying attention after dark chocolate. I love dark chocolate, it is my favorite of all the chocolates in the land. Not only does it taste better than the other kinds but it also offers some health benefits too. Lets take a second to list just a handful of reasons why dark chocolate is the king of awesomeness. 1) contains a large number of antioxidants, 2) Lowers blood pressure, 3) lowers cholesterol, 4) contains serotonin and 5) it stimulates endorphin production. Now when you factor in all of the benefits listed, how could this not be the perfect Valentine's Day cupcake? Slap on the coffee and you have the perfect make you feel good and forget your worries cupcake. Really, who could think of anything else when you are diving into one of these beauties?

Upside Down Cranberry Cake

Not sure what to do with your left over cranberries from the holidays? Well this is the perfect recipe to use them up. I came across this recipe over at Lisa's blog and I knew that I had to give it a try. I had a bag of left over cranberries sitting around from Thanksgiving and they were still good. I checked to make sure that I had everything to make the cake and then after dinner that night got to work making dessert. Just a heads up, this cake will not last long. The first night the Mr. and I ate half the cake. There is just something about the sweet cake and the tart cranberries that make you go back for more.

Caramel Apple Pie


I have been making this pie for Thanksgiving the past couple of years and I am a huge fan. I found it on All Recipes and fell in love. It has become a staple every year on Turkey day as much so as the mashed potatoes and stuffing. However with Christmas fast approaching and a feast to be prepared, I am still wondering, "what am I going to make this year?" Usually the Mr. and I fly or drive home to family, depending on where we are living at the time. This year we were unable to fly home for the holidays both because of the cost of a plane ticket and because the Mr.'s schedule. Which is a real bummer because the biggest holiday of the year for me and my family is Christmas Eve. No that is not a typo, I really mean Christmas Eve. Ever since I was a kid, every year on Christmas Eve the entire family would get together at my Aunt and Uncle's house and there would be movies playing in the living room, family members sitting around a table eating snacks in the dining room, kids playing with their toys in the bedrooms, as well as games of table tennis and pool going on. Well this year, it is just the Mr. and I. No crazy family members to celebrate Santa's return to Central NY or even getting to watch my niece open up her gifts on Christmas morning. Instead, we will have a quiet holiday with just us and the 3 kitties.

Melonpan

Just in case you are wondering, it is called melonpan (melon bread) not because it tastes like melon but because it resembles a melon. I did not score my bread to make the melon design, I was a little rushed at the time making other Japanese delights. However, you can add melon paste or melon extract to the dough if you wanted to but traditionally Japanese melonpan it is not flavored.

Baileys Cheesecake

Holy Cannoli Recipes hit 1 years old on the 6th. I have been so busy lately that I totally forgot the day. I cannot believe that in one year the site has gained so many followers. Not to mention the fact that I have done over 100 posts as well, that is a lot of recipes. I started this blog to write down the recipes I had tried so that I could share them with friends and family. Then slowly I got sucked into the blogging world and here I am. I enjoy sharing recipes with you guys and I also love reading your recipes as well.

PiƱa Colada Sorbet


When you think of the desert you think of intense heat and tons of sand... and you would be correct. So needless to say ice cream and all things icy cold are a big part of my diet right now. When I saw that this month was Puerto Rico at regional recipes I immediately thought of pina colada and came across this recipe for pina colada sorbet from all recipes.

This is easy to make and a nice twist to ice cream which is a nightly staple in this house. I love making homemade ice cream. It is still new to me but I just love watching it take form in the ice cream maker. This is the first sorbet I have made in my machine so I was really looking forward to digging in when it was finished. Now I am not a huge sorbet person but the coconut milk add a little bit of a creaminess to it which I like. I will definitely be keeping this recipe on hand to help beat this 106° heat.


  • 1 1/2 c. sugar
  • 1 1/2 c. water
  • 1 (20 oz) can crushed pineapple, drained
  • 1 (13.5 oz) can lite coconut milk
  • 1/4 c. lime juice about 2 limes
  1. Bring the sugar and water to a boil in a small pot over high heat, stir and boil until the liquid becomes clear, about one minute. Set aside to cool.
  2. Blend the drained pineapple in a blender or food processor until smooth and frothy.
  3. In a large bowl whisk together the syrup, pineapple puree, coconut milk, and lime juice. Refrigerate until chilled.
  4. Freeze in your ice cream maker according to the manufacturer's directions.


This post is submitted in
Regional Recipes
Tasty Tuesday
Tuesday Tastes