Dairy-Free Eggnog


 I will be honest, this year it just didn't feel like Christmas. Maybe because the temperature has been so nice and mild here in Okinawa, or maybe it's because I've been sick and feel like I've been playing catching up. Either way, I've been in a bah-humbug mood and wanted to get out of it. So, I decided to make eggnog. I've never really had it before, I've baked with the grocery store stuff but that's about it. However, this year I decided to throw caution to the wind and make a dairy-free version using maple syrup instead of sugar. Thankfully, it turned out to be a delicious custard drink, that my friend says tastes like legit eggnog. So, I will consider it a win and share the recipe here.


  • 6 large egg yolks
  • 1/4 cup maple syrup
  • 1 (13.5 oz) can  full-fat coconut milk
  • 2 cups unsweetened dairy-free milk
  • 1/4 teaspoon kosher salt
  • 1 teaspoon vanilla extract
  • teaspoon ground nutmeg


  1. In a medium bowl, add the egg yolks and maple syrup. Whisk together until light and creamy.
  2. In a saucepan over medium heat, combine the coconut milk, non-dairy milk and salt. Stir often, until the mixture just begins to simmer.
  3. Add a big spoonful of the hot milk to the egg mixture, whisking vigorously. Repeat, adding a big spoonful at a time, to temper the eggs.
  4. Once most of the hot milk has been added to the eggs, pour the mixture back into the saucepan on the stove.
  5. Place over medium-low heat and cook, whisking constantly, until the mixture reaches 160 to 165°F (about 2 to 5 minutes). The mixture should be just slightly thickened, it will continue to thicken as it cools.
  6. Immediately pour the mixture through a fine-mesh strainer into a large bowl; stir in the vanilla and nutmeg.
  7. Cover with plastic wrap and refrigerate until well chilled, at least three hours and up to one week.
  8. The dairy-free eggnog will thicken as it cools. If you want a thinner eggnog, pour the mixture into a blender with 2-3 tablespoons of cashew milk and blend until smooth.
 
* If using alcohol, you can either add it to the batch when you add the vanilla and nutmeg, or add a shot of your choice to your drink when you pour yourself a glass.

Curry Pinapple Chicken Fried Rice


Long time no see. It's been a while since I've uploaded a recipe. It's not that I haven't been cooking, because I have. I've just not been paying attention to my measurements, and just kind of winging it in the kitchen. However, I want to share some interesting dishes that I've been making. So without further ado, let's get to it!


This is a super simple dish to make. While the rice is cooking in the rice cooker, I cooked the rest of the dish. What I really loved about this dish is that, aside for the rice, everything is cooking in one pan. It took about half an hour to make from start to finish. However, don't let the quick cooking time fool you. This fried rice is packed with flavor due to the spices and pineapple. So, if you're in need of a quick and flavorful dish, give this one a try!


  • ½ lb. ground chicken/turkey
  • 1 tbsp. olive oil
  • 2 tsp. curry powder
  • 1 tsp. ground cinnamon
  • ½ tsp. ground ginger
  • 20 oz. can pineapple chunks (packed in juice, not syrup)
  • 3 cups cooked rice (cook the rice in chicken stock)
  • 1 cup diced carrots
  • 1/4 tsp. red pepper flakes (optional)
  • salt and pepper to taste after cooking


  1. Place the carrots in a large skillet with olive oil and cook for about 5 minutes until it starts to get soft. Add the chicken/turkey, spices, and pineapple juice (reserve the pineapple chunks for later) 
  2. While the meat cooks, mix the cooked rice, carrots and zucchini in a large mixing bowl. When the meat is done mix that in along with the pineapple and serve. Top with sriracha for more spice.

Christmas Tree Cheesy Spinach Stuffed Breadsticks


 Happy holidays everyone. This year for the holidays I decided to try my hand at making one of those fancy stuffed bread stick Christmas tree appetizers. I'm really glad I gave this recipe a shot because it was not only simple to make, but it was super festive.


The most difficult part was getting the pizza dough to cooperate and not stretch too much while I laid it over the top. Other than that, it was as simple as mixing everything together and baking it. It was a really good, too. It was the perfect appetizer to make while we watched holiday movies.

Recipe from It's Always Autumn


  • 12 oz. package of frozen spinach, thawed and squeezed dry
  • 6 oz cream cheese
  • 2 garlic cloves, minced
  • 1/2 tsp. onion powder
  • 1/4 tsp. pepper
  • 1/4 tsp. chili powder
  • 1/2 c. parmesan cheese, grated
  • 1 c. colby jack cheese, shredded
  • 1 tube of refrigerated pizza dough

  1. Preheat oven to 400* 
  2. In a bowl mix together all package of frozen spinach, cream cheese, garlic, onion powder, pepper, chili powder, parmesan, and half of the colby jack cheese.
  3. To shape the tree, cut a triangle out of the center of the pizza dough (from one end to the other). Use the outer triangle pieces to create one large triangle that should match the size of the original triangle you cut out. I put the base of my tree right on parchment paper for baking. You will want to assemble this right on your baking dish.
  4. Place the filling on top of one of the large triangles. Sprinkle the remaining colby cheese on top. Place the second triangle on top. 
  5. Slice the branches of the tree, leaving a small section of the middle intact to hold the tree shape. Twist ends to get the spiraled look.
  6. Bake for 22 minutes or until golden brown on top and cooked underneath. Serve warm.

This video shows how to make the tree shape in the dough. 

Cheesy Broccoli Dip


One of the things I like to do on the weekend is make dip. The weekends are our time to unwind and either play games, watch movies, or catch up on our shows. I tend to get bored with the same stuff, so I'm always trying new recipes that are not only easy to make, but not horribly bad for you. So, when I saw this dip that had broccoli in it, I knew I had to give it a try.


While I liked the sound of the original recipe I found online, there were a lot of things that I wanted to change about it. I wanted more broccoli, less fat, and I wasn't going to go out of my way to buy special seasonings that I'd never use again. I'm definitely glad I made the changes because I loved this dish. It was hearty, warm, and delicious. I served it with a loaf of french bread and just used a knife to spread it on.


3 cup broccoli florets, chopped small
1 (8 oz) 1/3 less fat cream cheese
1 cup plain fat-free Greek yogurt
1/2 cup fresh grated Parmesan cheese (not the stuff in a container)
1/2 cup Colby jack cheese, shredded
1/4 cup milk
1/2 tsp. onion powder
1/2 tsp. garlic powder
1/8 tsp. oregano
1/8 tsp. thyme
pinch of cayenne
fresh cracked pepper, to taste


  1. Preheat oven to 375 degrees F. Lightly oil a 9-inch baking dish or coat with nonstick spray.
  2. In a large bowl, combine cream cheese, 1/4 cup Colby jack cheese, yogurt, Parmesan, milk, and seasonings. Stir in the broccoli.
  3. Spread broccoli mixture into the prepared baking dish; sprinkle with remaining Colby jack cheese. Place into oven and bake until bubbly, about 30 minutes.
  4. Serve immediately.

Vegetable Pot Pie


One thing I love about the colder weather is heating the house up with the smell of a delicious casserole. I love pot pie and have tried a few recipes over the years. However, I realized that I've never tried a vegetable only pot pie. Since I already had everything on hand, I decided to give this recipe a try.


Every week I sit down and go through my recipes and my Pinterest board to come up with all the dinners I plan to make for that week. That way I know what I need to get from the grocery story. This was a recipe that I didn't have to buy anything for because I already had everything on hand. I even had some white wine already opened. Well, technically it's a boxed wine... so I always have some white wine "opened". By the way, if you like white wine, I recommend the Black Box Chardonnay. That's what I used for this dish and it's probably my favorite boxed white wine. It's got a light, crisp, and subtle fruity flavor that you'd expect from a white wine but then it ends on a creamy note. So, yeah, that's my wine of choice for this dish but any white wine like chardonnay or sauvignon blanc would work.


recipe adapted from Life Currents

  • 3 medium Yukon gold potatoes
  • 3 tablespoons olive oil
  • 1 large onion finely chopped
  • 1 1/2 cup carrots, peeled and sliced ¼-inch thick
  • 2 tablespoons unsalted butter or margarine
  • ½ cup unbleached all-purpose flour
  • 1 ½ cups milk
  • 2 cups vegetable broth
  • 1 ½ teaspoons kosher salt
  • ½ teaspoon freshly ground black pepper
  • 1 teaspoon dried thyme
  • ¼ cup white wine
  • 3/4 cup frozen peas thawed
  • 1 sheet puff pastry thawed and unfolded


  1. Preheat the oven to 400° F.
  2. Pierce the potatoes several times with a fork or knife, and microwave until cooked through, about 5-10 minutes, depending on the size of the potatoes and the power of the microwave. Allow potatoes to cool slightly so that you can handle them, and chop into ½-inch to 1-inch dice. Transfer cubed potatoes to a large bowl, and set aside.
  3. Heat a large pot or Dutch oven over medium-high heat, and add 1 tablespoon oil. Once the oil is hot, sauté the onions until starting to brown and caramelize, about 15-20 minutes. Add the carrots to the onions, and continue to cook, and until tender, about 5-7 minutes. Transfer cooked vegetables to the large bowl with the potatoes, and set aside.
  4. Reduce the heat to medium, and add the butter and 2 tablespoons oil to the same pot. When the butter has melted, stir in the flour and cook, stirring constantly for 1 minute. Slowly and gradually stir the milk, broth, thyme, salt, and pepper into the flour mixture. Continue to stir constantly as the sauce thickens. Stir in the white wine, and cook for an additional minute.
  5. Turn the heat off, and stir the cooked vegetables and the peas into the sauce, until well combined. Taste for salt and pepper.
  6. Pour the filling into a 13x9-inch baking dish, and bake in 400° F oven for 18 minutes. Remove the dish from the oven (keeping the oven on and close the door behind you), and place the puff pastry over the top of the filling, gently folding some of the pasty over the sides of the pan. Using a sharp knife, cut 3 slits in the top of the puff pasty to allow steam to escape. Return the baking dish to the oven and bake for an additional 10 minutes, until the puff pastry is golden brown and the filling is bubbly. Allow to cool for 5-10 minutes before serving.

Cranberry Jalapeno Dip


I'm not a huge peppermint person. However, during the holidays, I LOVE cranberries. The fresh stuff, not the sugary dehydrated craisins you see in stores year round. My go-to is usually Upside Down Cranberry Cake but this year I wanted to do something different. We love eating dip on the weekends and this was a great way to incorporate that with one of my favorite holiday ingredients.


One thing that I loved about this recipe was how easy it was to throw together. I thought I would have to cook the cranberries, but you don't. Although, you do want to make this the night before since it needs time to allow the flavors to meld together. One thing I do recommend is right before you go to put the cranberry mix on the cream cheese, slice up a little more green onion and mix it in. The green onion loses its vibrant color as it sits overnight and I really wanted a red and green color to the dip when I served it. I served this dip with Triscuits, but sliced bread or even water crackers would work with this. I just always have Triscuits on hand. One thing I changed from the original recipe was I added plain yogurt to the cream cheese. I always add fat-free plain yogurt to my cream cheese when I use it as a dip. It not only adds more volume without altering the taste, but it also adds a creaminess to the cream cheese and makes it smoother and less dense.

recipe adapted from Mel's Kitchen Cafe

  • 12 ounces fresh cranberries
  • 4-5 green onions, chopped
  • 1/4 cup chopped fresh cilantro
  • 1 jalapeno pepper, seeded and finely diced
  • 1/2 cup sugar
  • 1/2 teaspoon cumin
  • 2 tablespoons fresh lemon juice (from about 1 large lemon)
  • 2 (8 ounces) packages cream cheese, softened
  • 1/2 cup plain yogurt

  1. Chop cranberries until it's in small chunks and set aside in a bowl. You can also put the cranberries in a food processor or blender until coarsely chopped if you don't want to chop by hand. Add the green onions, cilantro, jalapeno, sugar, cumin, and lemon juice to the cranberries and mix until the ingredients are well combined. Transfer the mixture to a covered bowl or tupperware and refrigerate for at least 4 hours (I let mine sit overnight).
  2. When ready to serve, mix the yogurt and cream cheese together (I used my handheld mixture for this) and spread it in an even layer on a serving plate or 9-inch pie dish. Top with the cranberry-jalapeno mixture, spreading evenly over the top of the cream cheese.
  3. Refrigerate for up to an hour before serving. Serve with crackers or sliced bread.

Biscuits and Lentil Gravy

One thing that I love and miss about eating meat are biscuits and sausage gravy. That was something that I could eat for every meal of the day and have no regrets. Actually, when the Mister and I were traveling across the country, every hotel we stopped at had biscuits and gravy as one of their complementary breakfast items. I won't lie to you guys, I may or may not have chosen the hotels we stopped at for the night based on their breakfast options.


So, I was really excited when I saw a recipe for this in my copy of Thug Kitchen, a vegan cookbook. I've tried a few recipes from this book and honestly, they've not been that great. There's always something that doesn't work out or I end up feeling like it needs more or different spices from what the recipe calls for. Basically, the recipes end up being a bit bland. However, that didn't deter me from trying this recipe. Of course, the one thing that did not work for me were the vegan biscuits. They were awful. They were so hard and tough. No amount of gravy made them palatable. I would up throwing them out to the birds to eat. Thankfully, the gravy turned out amazing. So, after we choked down the first round, I went out and bought a tube of buttermilk biscuits to use for the leftovers. Once I made the change, these biscuits and gravy were golden.

  • 1 ½ cups of green or brown lentils
  • 5 cups of water
  • salt
  • ½ yellow onion, diced
  • 1 teaspoon olive oil
  • 1 teaspoon dried thyme
  • 2 cloves of garlic, minced
  • black pepper
  • 1 tablespoon flour
  • 1 cup of vegetable broth
  • 1 teaspoon soy sauce
  • 1 teaspoon paprika
  • ½ teaspoon red wine vinegar
  •  1 tube of biscuit dough or one batch of homemade biscuits

  1. Bake biscuits according to package.
  2. Bring the lentils, water, and a little bit of salt to a boil in a small saucepan. Simmer for 40 minutes to cook the lentils until they are falling apart.
  3. In a small skillet, heat up the olive oil over medium heat and sauté the onion until it starts to brown (3 minutes), add the thyme, garlic, and some black pepper and cook for another 30 seconds. Take off the heat.
  4. When the lentils are cooked, drain the excess water and put the lentils back into the pot.
  5. In a small bowl, mix together the flour and the broth. Add the broth mix into the lentils along with the onion, soy sauce, paprika, and vinegar.
  6. Use an immersion blender or a normal blender to blend the gravy to a smooth consistency.
  7. Heat the gravy up again and simmer in the saucepan to thicken, 2-3 minutes.

Pumpkin Curry Macaroni and Cheese


It's finally FINALLY cooled back down here in SoCal. While everyone back home was talking about rainy days and drinking hot cider, I was over here on the west coast dying from the insane dry heat we were getting. Nothing says fall more than wearing summer dresses and drinking iced coffee.  So, needless to say, I was really happy when the temperature started to dip into the 70's and immediately started pulling out my cans of pumpkin.


While most people view the fall as time to break out pumpkin spice things, I always look to the pumpkin itself. I love finding recipes that use pumpkin puree as part of the ingredients in a savory dish. This recipe was one that I was really excited to try because the Mister loved mac and cheese, and I'm a huge fan of curry dishes. So, the fact that it combined the two and incorporated pumpkin into the mix was a complete win.

recipe adapted from Flavor Mosaic


  • 2 cups of elbow macaroni
  • 2 Tablespoons butter or margarine
  • 3 Tablespoons all-purpose flour
  • salt and pepper to taste
  • 2 cups Half and Half
  • 1 ½ teaspoons curry powder
  • 1 cup pumpkin puree
  • 2 cups shredded Mozzarella cheese, divided
  • ½ cup panko bread crumbs

  1. Preheat oven to 350 degrees F. Cook the pasta to al dente in a large pot following package directions. Drain cooked pasta, then return to pot.
  2. In a large skillet or saucepan, melt butter over medium heat. Stir in flour, salt, and pepper. Pour in Half and half. Cook and stir over medium heat until slightly thickened and bubbly. Stir in curry powder. Stir in pumpkin and 1 cup mozzarella until cheese is melted. Stir cheese sauce into pasta to coat. Transfer the macaroni and cheese to a2-quart rectangular baking dish that's been sprayed with cooking spray.
  3. Sprinkle the remaining mozzarella over the pasta. Sprinkle the bread crumbs on top of the cheese. Spray with cooking spray.
  4. Bake, uncovered, for 30 minutes or until bubbly and top is golden. Let stand 10 minutes before serving.

Butterbeer


Okay, so this isn't the best picture in the world. It's just so hard to get a good picture of a creamy, frothy drink without it looking like a white fluffy mess in a cup. So, even though this doesn't look as cool and colorful as the amusement park's version, it's still delicious. Trust me!


Now, if you've ever read or watched Harry Potter, then you are well aware of butterbeer. However, it's nothing anyone has ever had a reference to before because the author made it up. However, she's been quoted saying that she imagines it to be a "little bit like less sickly butterscotch." So, with that in mind I scoured the internet looking for a recipe that would match the description, and crazily enough I only found one recipe that matched that description. So many places, including The Wizarding World of Harry Potter, make their butterbeer with cream soda. Which to me, would make it far too sweet and not really falling under the author's description of what she envisioned when she wrote the drink into the books. This butterbeer recipe doesn't use sugary soda as the base, it uses seltzer water. It gets the flavor from the homemade toffee sauce you make, the creamy texture from the dash of half and half, and the wonderful foamy top from the dairy reacting to the carbonation in the water. That's it! You can add more or less of the toffee syrup and/or cream to give the drink more sweetness/creaminess based off of your personal preference. You can also make this both hot and cold. I tried both and wound up dumping the warm version. There's just something about a warm fizzy drink that didn't appeal to me. However, I love the cold version. This is actually my second year making butterbeer but it's a tradition I plan keep. There's just nothing better than sitting down to watch Harry Potter with a butterbeer in hand.


recipe adapted from The Fig Test Kitchen


Toffee Syrup
  • 1 cup dark brown sugar, plus 4 tablespoons 
  • 2/3 cup water, plus 1 tablespoon
  • 1 stick butter 
  • 1-2 teaspoons vanilla extract
1. Mix 4 tablespoons brown sugar with 1 tablespoon water and microwave for 30 seconds-1 minute until a syrup is formed.
2. In a medium-small saucepan, combine 1 cup dark brown sugar with butter and syrup. Heat over medium heat until sugar is dissolved and the mixture bubbles a bit.
3. Add 2/3 cup water and vanilla extract. Gently boil for about 10 minutes, until mixture begins to thicken and gets syrupy.
4. Remove from heat. This is also awesome on vanilla ice cream, just for the record.

        Butterbeer
  • Toffee syrup 
  • Half and Half
  • Seltzer water (I used individual cans so it would stay carbonated)


Hot Variation
  1. Mix 2-3 tbsp toffee syrup with 6 tbsp half and half and microwave for 1 minute. 
  2. Fill rest of mug with seltzer. 


Cold variation
  • Mix 4 tbsp toffee syrup with 6 tbsp cool half and half, whisking together with a fork. Pour in cold seltzer while still whisking with the fork. 
* If you want a crisp white foam on top, wait to add the toffee until the end. Stir slowly as to not break up the bubbles. 


Celtic Apple Crisp with Honey Whiskey Whipped Cream


This is a recipe that is perfect for both St. Patrick's day and the fall. Especially with apple picking going on. Honestly, I'm not a huge fan of baking and am always looking for short cuts when it comes to the holidays and having to bake pies. Shocker, I know. While I love cooking, I don't relish spending half my day in the kitchen. So, this recipe is perfect for those like me who want to make a delicious dish or dessert without spending the day slaving away in the kitchen.


I love this recipe and it will be one I will make at least once a year. It was easy to make, I had just about all the ingredients on hand, and it tasted amazing. While I thought it was perfect, the Mister, who is a fan of whiskey, thought it could use more whiskey. Ha! Me, I'm not a fan of whiskey so the small hint of whiskey in this was just right for me. So, I split the whipped cream up and added a touch more whiskey to his batch.

recipe adapted from Home and Plate


  • 4 large honeycrisp apples, peeled and sliced into cubes
  • 1 teaspoon cinnamon
  • 1/2 cup water
  • 2 tablespoons whiskey
  • 3/4 cup brown sugar
  • 3/4 cup flour
  • 3/4 cup old-fashioned oats
  • 1/2 cup butter, melted
  • 1 cup heavy whipping cream
  • 1 tablespoon honey
  • 1 tablespoon whiskey


  1. Peel, core and chop the apples into 1-inch cubes.  Place the apples, cinnamon, whiskey and water in a bowl and toss. Then place the apples into a prepared pie pan. 
  2. In a small bowl combine the sugar, flour, oats and melted butter and mix until crumbly and well blended.  Sprinkle the mixture evenly over the apples.
  3. Place the pan in a preheated 350° oven and bake for 45 minutes until the crust is golden brown.  
  4. Whip the heavy cream on high speed until soft peaks form. Dissolve the honey in the whiskey stirring to incorporate. Add the honey flavored whiskey to the whipped cream in the final minutes of whipping. 
  5. Once the apple crisp has cooled serve it with the whipped cream.

Hawaiian Sloppy Joes


I love sloppy joes. It's one of my childhood favorites that has become a staple in this house as an adult. They are so easy to make, you can customize them with ingredients you like, and you can tweak the sauce to get a completely different tasting dish every time. Plus, they pair really well with tater tots or cauliflower tots.


One of my go-to dishes is my unsloppy joes. I've been making them for years and I love them, but I wanted to try something a little different. When I came across these Hawaiian sloppy joes, I knew I had found a winner.  I loved the sweetness that the pineapple adds to the sauce. I couldn't find any fresh pineapple at my grocery store so I bought a can of sliced pineapple instead. I will go ahead and say that fresh is definitely better in this but canned works in a pinch. It's not that the canned pineapple was bad but I think the fresh would have not only held up it's shape better but given the dish a more pineapple flavor. 
Recipe adapted from Vodka & Biscuits


  • olive oil as needed
  • 1 yellow onion, small dice
  • 1 green bell pepper, small dice
  • 2 cloves garlic, minced
  • 1 cup button mushrooms, finely chopped in food processor
  • 1/2 teaspoon salt
  • 1/4 teaspoon black pepper
  • pinch red pepper flakes
  • 1 cup cooked lentils
  • 1 cup diced pineapple
  • 1/4 cup low sodium soy sauce
  • 1/4 cup light brown sugar
  • 1 tablespoon apple cider vinegar
  • 14 oz. can tomato sauce
  • 1 pack hamburger rolls

  1. In a large pot, heat 2 tablespoons olive oil over medium high heat. Add the onions and peppers and cook until onions are translucent and peppers are soft, about 4-5 minutes.
  2. Add the garlic and cook until fragrant, about 45 seconds.
  3. Add the mushrooms and continue to cook until mushrooms become soft, another 5-6 minutes. Season with salt, pepper, and red pepper flakes. Cook an additional minute or two to let the flavors mingle.
  4. Stir in the lentils, pineapple, soy sauce, brown sugar. Mix until incorporated. Add the tomato sauce and vinegar and mix. Reduce the heat to medium and simmer uncovered for 20 minutes.
  5. Taste and adjust seasoning as needed. Allow to cool 10 minutes before serving on rolls.


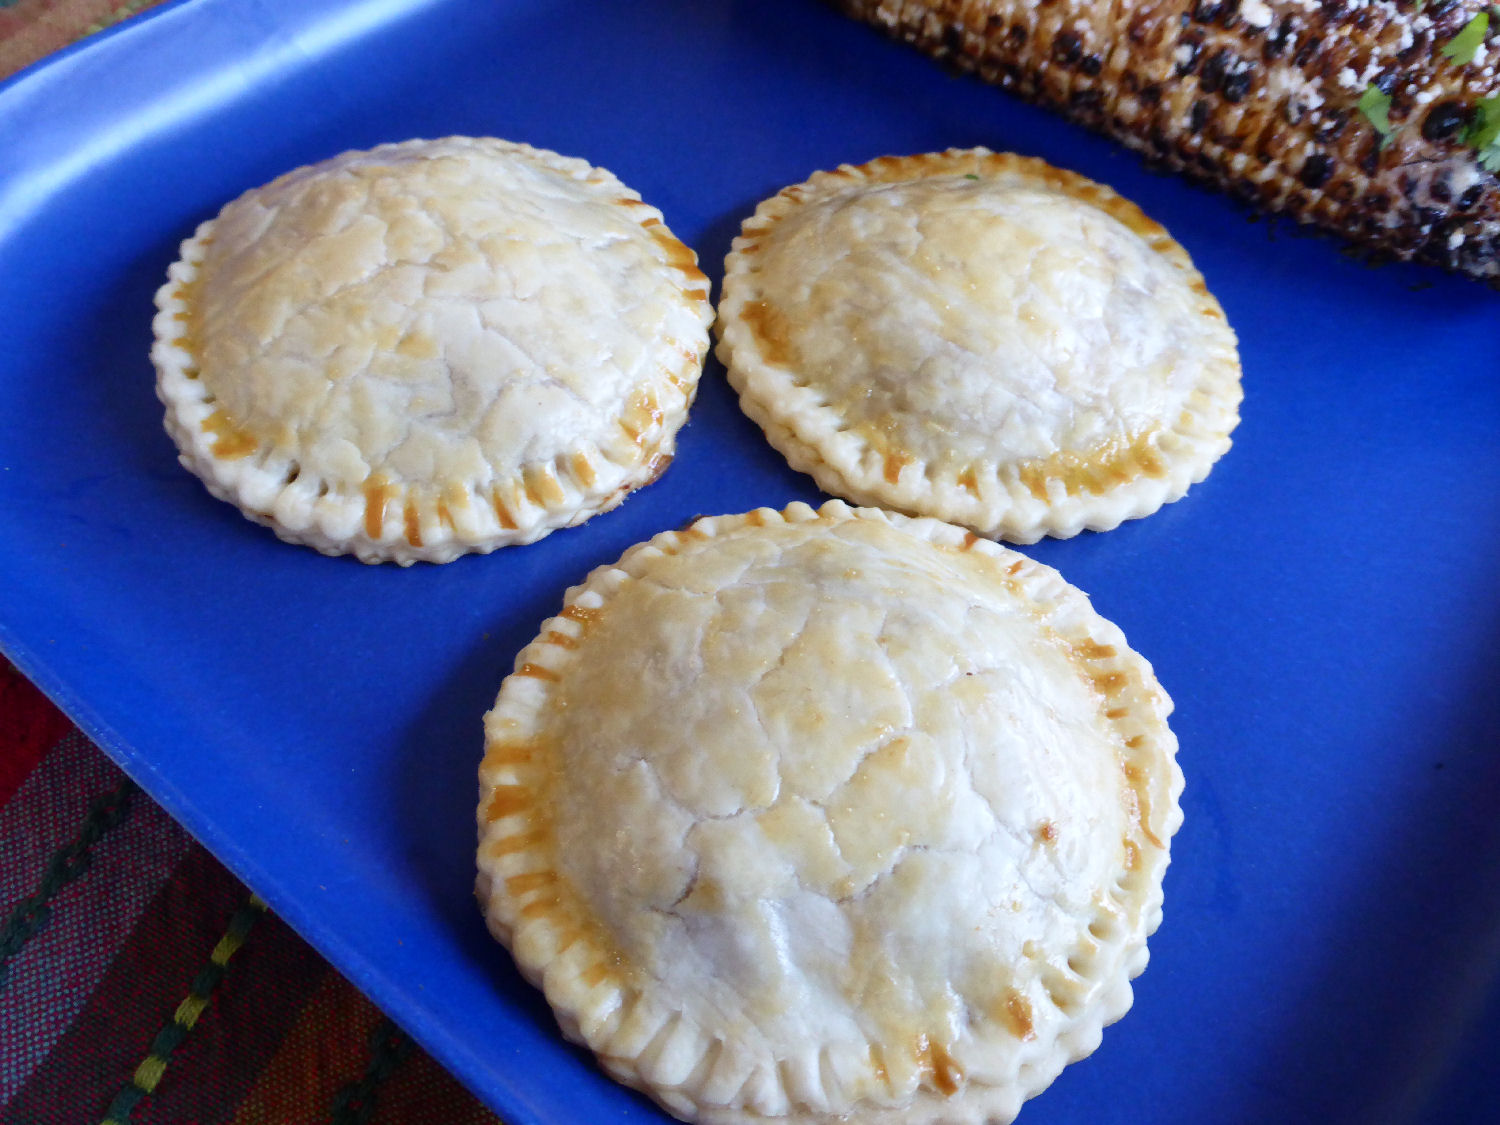
Soyrizo Mushroom Hand Pies


I love empanadas. I used to love when my cousin would make them when I'd come over for a visit. I think that was one of the few things I actually cooked as a teenager. Once I got married and moved away, I continued to make them. However, now that I've given up meat, I haven't been able to find a recipe that I like as much as the original one I used to make as a teen... until now.


One thing I ate before I had even given up meat was soyrizo. I love chorizo with all of it's flavors and spiciness but I have never been a huge fan of sausage, hot dogs, or any other sort of processed meat that leaves you not wanting to question what it's made out of. Soyrizo has all the same flavors as chorizo without any of the gross, questionable ingredients.


These hand pies are super easy to make. All the ingredients are readily available at pretty much all super markets and it's really quick to throw together. The only item that I wasn't sure I'd find was the Cotija cheese. For some reason my grocery story put it over by the ricotta cheese. If you can't find Cotija cheese, you can substitute it with either Parmesan or feta cheese. Cotija tasted like a combination of the two, so either of those should work if you can't find it. You can make the filling ahead of time to shave off half the prep time for these or you can make the hand pies ahead of time and store them in your refrigerator on a baking sheet until you are ready to pop them in the oven. I've done both and they turned out great. These are definitely going into my "keep" pile of recipes.


Recipe adapted from Comowater


  • 1 package Soyrizo (vegetarian chorizo)
  • 1/4 yellow onion, diced 
  • 3 1/2 cups sliced button mushrooms 
  • 3 Tbsp. olive oil 
  • salt 
  • pepper 
  • 1/2 cup cotija cheese
  •  4 roll out pie crusts 
  • 1 egg, beaten 
  • 1 tsp. milk 

  1. Preheat oven to 375° F.
  2. Add 2 tablespoons of olive oil to a saute pan and heat over medium heat. Cook soyrizo until slightly crunchy (about 7-10 minutes), stirring occasionally. Set aside and let cool completely.
  3. Add 1 tablespoon of olive oil to the same sauté pan and heat over medium. Add onions. Saute 2 minutes. Add mushrooms. Saute over medium until onions and mushrooms are soft; about 5 minutes. Add a small pinch of salt and a few grinds black pepper.
  4. Mix the cooled soyrizo with the onion/mushroom mixture and let cool completely before beginning hand pie assembly.
  5. Lightly spray cookie sheet with cooking spray. Lightly flour counter. Roll out pie dough to 1/4 inch thick. Cut out circles of desired size. Add filling to center of dough circle, leaving a 1/4-1/2 inch border around the edge of the dough. Wet the edge of the dough slightly with water. Top with second dough round and seal the hand pies closed. Lightly beat egg with milk to create an egg wash. Brush the top of the hand pies with egg wash. Add the hand pies to the cookie sheet. Bake approx. 15 minutes, or until golden brown. Let cool and enjoy!

Shrimp Tacos with Garlic Cilantro Slaw & Spicy Black Beans

 
It's still been pretty hot here. The heat just doesn't want to let up. Which means I've been eating a lot of grilled or quick dinners so as to not heat up the whole house. One of the dishes I've recently made were these delicious shrimp tacos. I know they don't look all that great in the photo, but trust me, they were amazing. The Mister and I ate kind of ate the whole batch and I used the leftover slaw for breakfast tacos the next morning.
I wanted to show the tacos without the extra sauce and cheese on them

This was a quick and easy dinner to throw together. You can make the slaw and spicy black beans ahead of time and then just cook the shrimp when it's time for dinner. Just be sure to reheat the beans. The original recipe called for shredded cabbage but I went with a bagged coleslaw mix so that I didn't end up with a ton of cabbage leftover in my refrigerator. Plus, I liked the added bonus of the carrots in my taco. Made me feel like I was eating super healthy. If you can't find Cotija cheese (mine looked like a round wheel of cheese) I would substitute it out with feta, but I would really try to find Cotija.  I've never had Cotija cheese before but it reminded me of a mix between feta and Parmesan cheese. I have to say, I'm a huge fan of this cheese. I was putting it on everything.


recipe adapted from Pinch of Yum

For the Garlic Cilantro Lime Sauce
  • ¼ cup oil
  • ¼ cup water
  • ½ cup chopped green onions
  • ½ cup fresh cilantro
  • 2-3 cloves garlic
  • ½ teaspoon salt
  • juice of 2 limes
  • ½ cup plain fat-free yogurt
For the Shrimp Tacos
  • 1 lb. shrimp, peeled and deveined, tails removed
  • 1 tsp chili powder
  • 1 tsp. cumin powder
  • ¼ tsp cayenne pepper  
  • Kosher salt
  • Freshly ground black pepper
  • 2-3 cups coleslaw mix
  • 8 small corn tortillas
  • 1-2 avocados
  • Cotija cheese and additional cilantro for topping
  • lime wedges for serving

  1. Pulse all the sauce ingredients except the sour cream in a food processor. When mostly smooth, add the sour cream and pulse until combined. Taste and adjust as needed. Set aside.
  2. Heat a drizzle of oil a large skillet over medium high heat. Pat the shrimp dry with paper towels and sprinkle with the spices, and a little salt and pepper. Add the shrimp to the hot pan and saute for 5-8 minutes, flipping occasionally, until the shrimp are cooked through.
  3. Toss some of the sauce (not all) with the cabbage until it the cabbage is coated to your liking. It should resemble a coleslaw - you want it to be enough sauce so the cabbage is weighed down a little bit. Use leftover sauce on top of the tacos or in other recipes.
  4. To serve tacos, smash a spoonful of avocado on the tortillas, top with a few pieces of shrimp, top with coleslaw, and finish with Cotjia cheese, cilantro, and lime wedges.

For the Spicy Black Beans
recipe adapted from Tyler Florence
  • 2 cups (about 1 pound) dried black beans, picked over, soaked overnight
  • 3 tablespoons extra-virgin olive oil
  • 1/2 medium onion, diced
  • 1 jalapeno pepper, chopped
  • 2 cloves garlic, chopped
  • 1 bay leaf
  • Kosher salt
  • Freshly ground black pepper

  1. In a large pot, soak beans overnight covered in water by 2 inches. Drain and set aside.
  2. In the same pot, heat the olive oil. Add the onion, jalapeno pepper, garlic, and bay leaf and cook until the vegetables begin to soften, about 5 minutes. Add the beans and cover with water by about 1-inch. Bring to a boil, reduce the heat, cover, and simmer for 1 to 1 1/2 hours, or until the beans are tender. Remove the bay leaf and discard. Taste the beans and season with salt and pepper.

Slow-Cooker Black Bean Quinoa Stuffed Peppers


I don't know about you but when it gets hot here, the last thing I want to do is spend time in the kitchen. Especially when we're going through a heatwave and I don't have air conditioning to cool down the house. When it comes to moments like these I usually do one of two things, cook on the grill or cook with my slow-cooker. Now I know what you're thinking, running a slow-cooker heats up the house, too. You would be correct. However, I put the slow-cooker in our garage or out on the back patio where it won't heat up the house. It's a little abnormal but I end up with a delicious home-cooked meal that's full of flavor and I didn't have to heat up my whole house to make it. ;)


I'm a big fan of stuffed peppers. There's so many different ways you can make them. I've had the traditional version, enchilada version, and even a lasagna version. All were very delicious and filling. However, one thing they all had in common was that I would boil the peppers before assembling them and then bake them in the over to finish them off. Neither of which is happening when it's in the 90's. This recipe requires neither of those things since it's all made in the slow-cooker. However, because I had to make the quinoa, I wound up making it the night before after it had cooled off some, and stored it in the refrigerator until the next morning.

recipe adapted from Pinch of Yum


  • 6 bell peppers
  • 1 cup uncooked quinoa, rinsed
  • 2 (14 ounce) can black beans, rinsed and drained
  • 1½ cups red enchilada sauce
  • 1 teaspoon cumin
  • 1 teaspoon chili powder
  • 1 teaspoon onion powder
  • ½ teaspoon garlic salt
  • 1½ cups shredded cheddar, colby jack, or pepper jack cheese
  • cilantro, guacamole, salsa, avocado, sour cream, for toppings

  1. Cut the tops off of the peppers and scrape out the ribs and seeds.
  2. In a large bowl, combine the quinoa, beans, enchilada sauce, spices, and 1 cup of the cheese. Fill each pepper with the quinoa mixture.
  3. Pour ½ cup water into the bottom of a slow-cooker. Place the peppers in the slow-cooker so they're sitting in the water. Cover and cook on low for 6 hours or high for 3 hours. Remove lid, distribute remaining cheese over the tops of the peppers, and cover again for a few minutes to melt the cheese.
  4. Top the stuffed pepper with your choosing. 

Slow-cooker S'mores Cake


 You may not know this about me but I love all things S'mores. ALL things. I have tried various versions of S'mores, I've made them in a microwave, in the over, on the stove, and of course over the fire. I've have S'mores cheesecake, cupcakes, cookies, pastries, Pop-Tarts, you name it. I even have a mini S'mores Christmas tree with mini S'mores snowmen ornaments. Trust me, I'm a fanatic about S'mores and this is definitely a MUST if you are anything like me. ;)


One thing I LOVE about this recipe is how easy it is to put together. There's not a whole heck of a lot of work that you put into this but even if there was, I feel like it would be worth it. This is kind of like a S'mores lava cake mashup. You get all the flavors of S'mores but with this gooey, fudgy center. Mmm! Now one thing I did change in the recipe, and I do it all the time when a cake calls for oil, is I swapped out equal parts natural apple sauce for the oil. Trust me, this is an amazing cake that you don't have to fuss over. I even had leftovers, and after a quick zap in the microwave they were just as good as they were the night I made it.


adapted from A Savory Feast
  • 1 1/2 cups graham cracker crumbs
  • 6 tbsp butter, melted
  • 1 (15.25 oz) box chocolate cake mix
  • Water, egg and oil as directed on cake mix box
  • 1 (12 oz) bag chocolate chips
  • 1 1/2 cups mini marshmallows
  1. Grease a slow cooker.
  2. In a medium bowl, combine the graham cracker crumbs, and butter. Mix until well blended.
  3. Press the graham cracker crust down evenly in the bottom of the slow cooker.
  4. Mix the cake mix according to the directions on the box. Add 1/2 of the chocolate chips.
  5. Pour the cake mixture into the slow cooker.
  6. Cook on high for 2 to 2 1/2 hours or until a toothpick inserted into the center comes out clean.
  7. Top with marshmallows and the remaining chocolate chips. Let melt before serving.

Baked Lentil Ziti


I'm always on the look-out for recipes that take a well-loved dish with meat, and turn it into a meatless version. I'm also a huge lover of beans. Even when meat-free dishes don't call for beans, I'm usually adding them in anyways. So I was really excited when I saw this recipe that took one of my favorite family dishes, baked ziti, and not only omitted the ground meat, but also added in lentils. It's been a very long time since I've had baked ziti but that's all about to change with this recipe. I thought it was delicious and I will definitely be holding onto this recipe for later.


This is a super easy dish to make. I feel like I say that all the time but I am a lover of easy recipes. You can cook the lentils and pasta ahead of time and set them in the refrigerator until you're ready to make the dish. You could even make the whole thing, put it in the casserole dish and store it in the refrigerator until you are ready to eat, and then just pop it into the oven. Either way, it's as easy as cooking pasta and lentils, mixing everything together in the casserole dish, and baking it until it's bubbly. I loved the taste of this and definitely used a little bit more sauce than the recipe called for but that's because I don't like dry pasta.


 There are a couple things I want to point out that I did differently from the recipe. I used gluten-free pasta. I've tried using gluten-free pastas in the past for various dishes and have found that they don't always hold up, especially when it's a one-pot recipe where the pasta cooks in the liquid with everything else. However, the pasta worked great in this dish, but I did under-cook it by about 2 minutes, so it still had some bite to it before I added it into the casserole dish to bake. So, if you plan to use gluten-free pasta just be sure to under-cook it a bit so that it holds it's shape and doesn't turn to mush while the casserole bakes. I also didn't put the cheese on the casserole for the initial baking process. Mainly because the casserole came right up to the top and if I put foil on it, the cheese would have stuck... and I didn't feel like rummaging around my cabinet looking for toothpicks. So, I put the foil on the casserole without the cheese for the first half of baking and then when it was time to crank the heat and remove the foil, I put the cheese on and baked it until it was bubbly.  Like I said before, I really enjoyed this dish and it will be a winter staple in our house from here on out.


recipe adapted from Cookie and Kate


Lentils:
  • 1 tablespoon olive oil
  • 1 onion, chopped
  • ¼ teaspoon salt
  • 2 cloves garlic,  minced
  • 1¼ cups regular brown lentils, picked over for debris and rinsed
  • 3 cups water
Pasta and everything else
  • 12 ounces ziti, rigatoni or penne pasta
  • 2 cups grated part-skim mozzarella cheese
  • Salt and freshly ground black pepper, to taste
  • Pinch of red pepper flakes (omit if sensitive to spice)
  • 24 ounces spaghetti sauce
  • 1 cup cottage or ricotta cheese

  1. To cook the lentils: In a large saucepan over medium heat, warm the olive oil until shimmering. Add the onion and salt. Cook, stirring occasionally, until the onion is turning translucent, about 4 to 5 minutes. Add the garlic and cook until fragrant, about 30 seconds. Add the lentils and water, and stir to combine.
  2. Raise the heat to high and bring the mixture to a simmer, then reduce heat to medium-low and gently simmer until the lentils are tender and cooked through, about 30 to 40 minutes. Drain the mixture well in a fine-mesh sieve and return the lentils to their pot. Set aside.
  3. Meanwhile, preheat the oven to 350 degrees Fahrenheit and bring a large pot of water to boil. Cook the pasta just until al dente, according to package directions. Drain and return the pasta to the pot. (if using gluten-free pasta under-cook the pasta. It will continue to cook in the oven)
  4. Add the lentils to the pasta. Add ½ cup of the cheese, reserving the rest for later. Season to taste with salt, freshly ground black pepper, and red pepper flakes (if using).
  5. Pour 1 cup of the marinara sauce into a 13x9-inch baking dish. Spread the sauce around with a spatula so the base of the baker is evenly coated. Pour the lentil and pasta mixture into the baker and spread it so it’s evenly distributed. Using a spoon, dollop cottage or ricotta cheese in big spoonfuls over the pasta, then just lightly swirl the mixture a bit so the cottage cheese is still concentrated in those areas.
  6. Drizzle the rest of the sauce evenly over the dish (adding extra sauce if you’d like) and gently spread it over the pasta. Sprinkle the remaining mozzarella evenly over the dish. Cover the baker tightly with aluminum foil—don’t let it touch the cheese—or stick a few wooden toothpicks down the center and place a generously sized piece of parchment paper, folded in the middle to make a “tent” over the baker.
  7. Bake for 30 minutes, then remove the covering, increase the heat to 450, and continue baking until the cheese on top is golden and spotty, 3 to 9 more minutes. Remove from the oven and let it cool for 10 minutes before serving.

Three Bean Slow Cooker Chili


We've been experiencing a very wet and cold winter here in SoCal. So, I've been breaking out all my favorite winter recipes lately. One thing I love to make on a cold miserable day is chili. I don't know why those two things go together but they do. It's kind of like being sick and having soup. However, chili takes a lot of time to make, and depending on the style of chili you make, it can also be time consuming to prep. If you haven't noticed by now, I'm a lazy cook. I don't like to spend a ton of time in the kitchen slaving away. Which is why this slow cooker chili is my favorite. It's bursting with flavor, takes minimal time to prep, and the slow cooker does all the cooking for you.


I usually always make my chili in the slow cooker just because chili needs to simmer low and slow for some hours in order to really develop flavor. I don't know about you, but I don't hours to spend stirring a pot of chili making sure it doesn't burn or bubble over. I can put it all in the slow cooker and go to work, run errands, clean the house, read a book, binge watch my favorite shows and not have to worry about dinner. I love it! I used to soak and cook my beans before putting them in the slow cooker but I've recently discovered that you don't have to do that. You just have to rinse the beans to clean them, and then you just pour them in the slow cooker with your ingredients and extra broth to cook them. Making chili has never been easier than this. Now, I don't eat meat so this is for a vegetarian three bean chili. However, if you would like meat, I would brown a pound of ground beef and add it to the rest of the ingredients already listed.


  • 1 large carrot (about 2 cups), peeled and grated
  • 1 large zucchini (about 1 cup), grated
  • 1 bell pepper, chopped
  • 1 (14 oz) can diced tomatoes
  • 2 c. dried kidney beans
  • 1 c. dried black beans
  • 1/2 c. dried garbanzo beans
  • 1.5 c. frozen corn
  • 2 Tbsp. hot sauce
  • 1 packet low-sodium chili seasoning mix
  • 7 c. vegetable broth

  1. Rinse beans and make sure there are no rocks or debris mixed in.
  2. Add all the ingredients into your slow cooker and cook on high for at least 8 hours or until the beans are tender and the flavor has come together. 
  3. Top chili with toppings of choice (shredded cheddar cheese, avocado slices, chopped onion, or corn chips)